
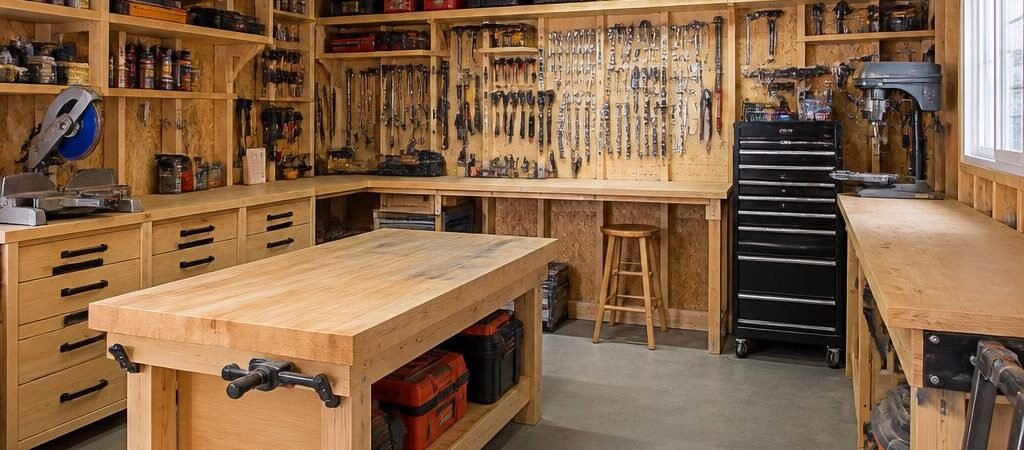
The best workshop shed plans combine efficient layouts with practical storage solutions. A well-designed detached workshop keeps your benches, tools, and project materials organized while maximizing every square foot of your backyard workroom space.
Top Workshop Shed Plans: Maximize Your Backyard Space
You’ve been working in your garage for years. The space is crowded, tools are buried, and your projects suffer because you can’t find what you need. Your neighbor’s new backyard workroom makes you wonder if a dedicated workshop shed could solve your problems.
Good workshop shed plans don’t just give you a building — they give you a system. The right layout turns a basic shed into a functional hobby shop where every tool has a home and every project has room to breathe.
Why Do Workshop Shed Plans Matter for Your Daily Projects?
Most people build sheds without a plan and regret it within months. Tools end up on the floor. Workbenches block doorways. You spend more time searching than working.
Proper workshop shed plans address these problems before they happen. They map out your workflow, place your bench where you need it, and build in storage where it makes sense.
Here’s what separates a cluttered shed from a productive workshop:
- Clear zones for different project types
- Tool storage within arm’s reach of your workbench
- Space for material storage that doesn’t eat into your work area
- Adequate lighting and outlet placement
- Room to move between tasks without bumping into things
When you start with solid detached workshop plans, you avoid costly mistakes like undersized doors or benches that block your only exit.
Choosing the Right Workshop Shed Plans for Your Space
Before you cut any lumber, you need to figure out what size workshop shed you actually need. This depends on your projects, your tool collection, and how much backyard space you can spare.
Small Workshop Sheds (8×10 to 10×12 feet)
These work well for hobbyists who do woodworking, small repairs, or seasonal crafts. You’ll fit one workbench along the back wall, wall storage for hand tools, and a compact tool storage shed section for power tools.
Expect to spend between $3,000 and $6,000 for materials on an 8×10 shed. A 10×12 gives you more breathing room and pushes the total to roughly $4,500 to $7,500.
Medium Workshop Sheds (12×16 to 16×20 feet)
At this size, you can add a second workbench, build in a parts cabinet, and create dedicated zones for different projects. A 12×16 shed gives you about 192 square feet — enough for serious hobby work without dominating your yard.
Materials for a 12×16 typically run $6,000 to $10,000. A 16×20 jumps to approximately $9,000 to $14,000 depending on finishes and electrical work.
Large Workshop Sheds (20×24 feet and up)
These are full hobby shop buildings. You can fit multiple workstations, a tool storage shed wall, material racks, and still have floor space to swing a large project around.
Expect $14,000 to $25,000+ in materials for a 20×24. Add electrical, climate control, and concrete flooring, and you’re looking at significantly more.
| Shed Size | Square Feet | Material Cost Range | Built Time (DIY) | Best For |
|---|---|---|---|---|
| 8×10 | 80 sq ft | $3,000–$6,000 | 3–5 weekends | Light hobby work |
| 10×12 | 120 sq ft | $4,500–$7,500 | 4–6 weekends | Regular projects |
| 12×16 | 192 sq ft | $6,000–$10,000 | 6–8 weekends | Serious woodworking |
| 16×20 | 320 sq ft | $9,000–$14,000 | 2–3 months | Full hobby shop |
| 20×24 | 480 sq ft | $14,000–$25,000+ | 3–5 months | Professional-grade workspace |
Most DIYers find that a 12×16 or 16×20 hits the sweet spot. You get enough room for proper layouts without turning the build into a second job.
Step-by-Step: Building Your Detached Workshop Plans
Building a workshop shed follows the same basic process as any shed build, but the interior layout requires more forethought. Here’s the sequence that keeps things on track.
Step 1: Site Selection and Foundation
Pick a level spot with good drainage and easy access from your house. You’ll carry tools and materials in and out constantly, so distance matters more than you think.
Choose your foundation type based on your budget and local codes. A gravel pad works for smaller sheds and costs $500 to $1,500. Concrete pavers run $1,000 to $2,500. A full concrete slab costs $3,000 to $8,000 but gives you the most durable, level floor for heavy machinery.
Step 2: Floor Framing
Build your floor frame using 2×8 or 2×10 joists spaced 16 inches on center. Cover with 3/4-inch exterior-grade plywood. This gives you a solid base for workbenches and heavy tools without flex or bounce.
Step 3: Wall Framing and Sheathing
Frame walls on the floor, then raise them together. Use 2×4s for standard walls. If you want better insulation later, 2×6 walls give you room for R-13 batts without eating interior space.
Step 4: Roof Construction
A simple gable roof is the most forgiving design for beginners. Use 2×6 trusses spaced 24 inches on center for spans up to 12 feet. Cover with oriented strand board and asphalt shingles.
Step 5: Doors, Windows, and Electrical
Install a wide door — at least 36 inches, ideally 48 inches. You’ll be moving project materials in and out, and narrow doors become frustrating fast.
Wire for at least four outlets on separate circuits. Plan outlet placement based on where your workbenches will go. Add a ceiling light and consider a window for natural light.
Step 6: Interior Buildout
This is where your workshop shed plans come alive. Install your workbench, build tool storage along the walls, and set up material racks. The layout section below shows you how to arrange everything.
Optimizing Layouts for Tool Storage Shed Organization
The best workshop shed plans place your workbench against the longest wall, facing into the space. This gives you a solid backrest, wall storage within arm’s reach, and visibility of the door so you can watch for visitors or weather changes.
Primary Workbench Zone
Your main bench should sit 36 inches from the wall in front of it. That gives you room to walk behind while working and space to pull out long boards without hitting the wall.
Build a bench that’s 24 inches deep and at least 4 feet long. Use a 2×10 top covered with 3/4-inch plywood for a surface that can take a beating. Add a vise, a tool tray, and shelving underneath for project materials.
Wall Storage Strategies
Install a French cleat system on the wall behind your bench. This gives you flexible storage that adapts as your tool collection grows. Pegboard works well too, especially for hand tools.
Build wall cabinets above the bench for items you use less frequently. Keep your most-used tools at waist height and heavy items on lower shelves.
Tool Storage Shed Section
Designate one wall or corner specifically for power tool storage. Use a rolling cart for frequently used tools like your table saw or miter saw. Fixed shelving works for larger items you don’t move often.
Consider a locked cabinet for expensive tools or hazardous materials. This is especially important if children or neighbors have access to your backyard workroom.
Material Storage Zone
Build lumber racks along one wall for long boards. Angle them at 45 degrees so materials don’t slide off. Keep a section for sheet goods — vertical racks work better than horizontal stacks.
Leave a clear path between your material storage and your workbench. You need to pull boards out without climbing over everything.
Comparing Workshop Shed Plans: Cost vs. Complexity
Not all workshop shed plans are created equal. Some are simple box designs you can build in a weekend. Others include detailed layouts, electrical plans, and custom storage solutions that take weeks to construct.
| Plan Type | Cost | Difficulty | Build Time | Best For |
|---|---|---|---|---|
| Basic shed plans | $20–$50 | Beginner | 2–3 weekends | Simple storage shed |
| Standard workshop plans | $50–$100 | Intermediate | 4–6 weekends | DIY workshop with basic layout |
| Detailed hobby shop plans | $100–$200 | Intermediate to advanced | 6–10 weekends | Full workshop with custom storage |
| Professional-grade plans | $200–$400 | Advanced | 2–3 months | Complex layouts, electrical, insulation |
Free plans online can work for simple builds, but they rarely include interior layouts. If you want a functional workshop shed rather than just a storage box, investing in detailed plans pays off quickly.
Hobby Shop Building Tips for a Functional Backyard Workroom
Turning your workshop shed into a true hobby shop comes down to three things: lighting, ventilation, and workflow.
Lighting That Works
Install bright LED panels in your main work area. Aim for at least 5,000 lumens over your primary bench. Add task lighting for detailed work and ambient lighting for general movement.
Position lights so they don’t cast shadows while you’re working. Overhead panels work best, but a clamp light on your bench helps for close work.
Ventilation Matters
Wood dust, fumes from finishes, and general stuffiness make a workshop unpleasant fast. Install a vent fan or window exhaust to pull hot air out. A simple $50 box fan in a window helps more than you’d expect.
If you plan to use a table saw or other dust-producing tools, invest in a shop vacuum with a proper dust collection system. Your lungs will thank you.
Workflow Design
Arrange your workshop so your project flow makes sense. Raw materials enter, you cut and shape them at your main bench, assemble nearby, and finish in a separate area if possible.
Don’t cram everything into one zone. Even a 12×16 shed can have distinct areas for cutting, assembly, and finishing if you plan the layout carefully.
Workshop Shed Plans: FAQ
How big should a workshop shed be for a hobbyist?
A 12×16 shed gives most hobbyists enough room for a workbench, tool storage, and material storage without feeling cramped. If you work on large projects like furniture, aim for 16×20 or bigger.
Do I need permits for a detached workshop?
Most municipalities require permits for structures over a certain size, typically 120 to 200 square feet. Check your local building codes before breaking ground. Some areas also have setback requirements from property lines.
Can I insulate a workshop shed for year-round use?
Yes. Use 2×6 walls and fill with R-13 fiberglass batts or spray foam. Add a vapor barrier on the warm side and finish with plywood or drywall. A small mini-split heater and fan will keep the space comfortable in most climates.
What’s the cheapest way to build a workshop shed?
Build a simple 10×12 shed with a gravel pad foundation, 2×4 frame, and basic interior layout. Use affordable materials like T1-11 siding and asphalt shingles. Total cost can stay under $5,000 if you do the work yourself.
How do I organize tools in a small workshop shed?
Use vertical space. French cleat walls, pegboard, and hanging racks keep tools off your bench and floor. Store heavy items on lower shelves and lightweight frequently used tools at waist height. A rolling cart adds flexibility without permanent changes.
Your Workshop Shed Action Checklist
Before you start building, run through this list to make sure your workshop shed plans cover everything you need.
- Measure your space: Confirm you have room for your target shed size plus clearance around it
- Check local codes: Verify permit requirements and setback rules with your municipality
- Choose your foundation: Pick gravel, pavers, or concrete based on budget and intended use
- Sketch your layout: Place your workbench, tool storage, and material zones on paper before building
- Plan your electrical: Map outlet locations, lighting, and circuit needs before closing walls
- Source your materials: Get quotes for lumber, roofing, and finishes from local suppliers
- Set a timeline: Break the build into phases and schedule weekends around each step
- Buy the right tools: Make sure you have the basics — circular saw, drill, level, square, and measuring tape
Building the right workshop shed takes planning, but the payoff is a dedicated space where your projects actually get done. Good workshop shed plans give you the roadmap. The rest is just showing up and building.