
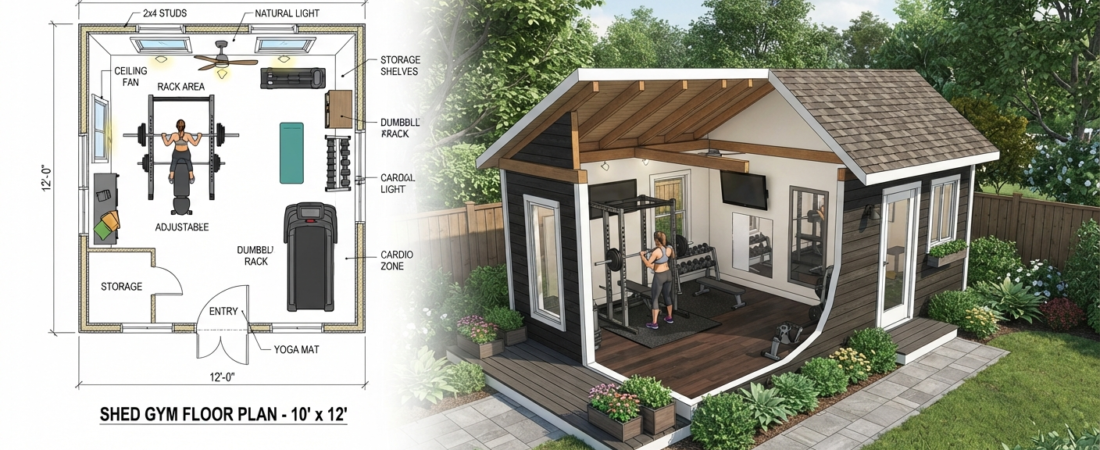
The best shed plans for gym projects start with a 10×12 or 12×16 footprint, giving you enough room for a squat rack, dumbbell storage, and floor space to move. Proper ventilation, insulation, and a solid foundation are what separate a functional home gym outbuilding from a sweaty storage shed.
Why Shed Plans for Gym Projects Are Worth the Investment
The home fitness market has exploded. More people are choosing to build their own training spaces instead of paying monthly gym fees or cluttering their living rooms with equipment. A detached fitness studio gives you complete freedom over layout, lighting, and climate control without disturbing the rest of the household.
The numbers support the trend. The global home gym equipment market alone reached over $17 billion in recent years, and a growing segment of that investment goes into dedicated structures rather than corner setups. People are treating their backyard workout room as a real room, not an afterthought.
A well-planned shed gym eliminates the main friction points that make home workouts fail. There is no commute. There is no waiting for equipment. There is no excuse about the weather. You step outside and you are already in workout mode.
Choosing the Right Size: What Your Gym Actually Needs
So what size actually makes sense for most people? The answer depends on how you train, not on what fits in your backyard. Here is a practical breakdown that cuts through the guesswork.
8×10: The Absolute Minimum
An 8×10 space gives you roughly 80 square feet. You can fit a flat bench, a small rack, and maybe a treadmill if you are careful about placement. Floor space for movement is tight. This size works best for one person doing bodyweight training, light weights, or yoga-style workouts. It is compact, affordable, and fast to build, but you will feel cramped the moment you add a second piece of equipment.
10×12: The Sweet Spot for Most Builders
A 10×12 shed plan for gym use delivers 120 square feet. This is where things open up. You can place a power rack against one wall, stack dumbbells along another, and still have room for a rowing machine or a small treadmill in the corner. The center floor stays clear for burpees, jump rope, or stretching. This size handles one to two people comfortably and leaves breathing room for equipment expansion later.
12×16: Room to Grow
At 192 square feet, a 12×16 layout gives you genuine flexibility. You can zone the space with a lifting area on one side and a cardio zone on the other. Adding a second rack, a weight bench, and a full-length mirror still leaves walkway space. This is the size most builders recommend if you plan to invest in serious equipment over time.
16×20 and Larger: The Full Studio Approach
Anything beyond 16×20 enters full studio territory. At 320 square feet, you can install a squat rack, a deadlift platform, a bench press station, and still have room for a TV or speaker system. This size also accommodates two people training at the same time without bumping into each other. The trade-off is higher material costs, a more complex foundation, and the need to check local zoning rules before breaking ground.
| Size | Square Feet | Best For | Equipment Capacity |
|——|————-|———-|——————-|
| 8×10 | 80 sq ft | Bodyweight, light weights, yoga | 1-2 pieces + floor space |
| 10×12 | 120 sq ft | General home gym, one person | Rack, bench, cardio, mirror |
| 12×16 | 192 sq ft | Serious training, equipment expansion | Multiple racks, platforms, TV |
| 16×20 | 320 sq ft | Full studio, two-person training | Complete setup with zoning |
Foundation Options That Actually Hold Up Under Heavy Equipment
The foundation is the part most first-time builders rush through. A gym shed carries far more dynamic load than a storage shed. Dropping weights, jumping, and shifting equipment create point loads that a weak base cannot handle. Skipping this step properly will lead to squeaky floors, shifted walls, and cracked siding within a year.
Concrete Slab: The Gold Standard
A 4-inch poured concrete slab reinforced with rebar or wire mesh is the most durable option. It handles heavy racks without flex, provides a clean surface for rubber flooring, and resists moisture when sealed properly. The downside is cost and permanence. Pouring a slab for a 12×16 space typically requires a professional mix or a serious DIY commitment with forms, grading, and curing time.
Gravel Base with Paver Stones
A compacted gravel sub-base topped with interlocking pavers is a solid middle ground. It drains well, costs less than concrete, and is forgiving if you need to adjust the layout later. This approach works best for lighter equipment setups and smaller footprints under 12×12. Heavy racks on pavers can shift over time if the base compaction was insufficient.
Pier Foundation with Floor Joists
Concrete piers with treated lumber floor framing elevate the structure off the ground. This is the most common approach for shed plans for gym because it allows airflow underneath, simplifies electrical and plumbing runs, and keeps the floor level on uneven terrain. The key is spacing piers no more than 4 feet apart and using pressure-treated joists rated for ground contact.
Ventilation and Climate Control: The Non-Negotiables
A gym shed without proper ventilation is a sauna with equipment in it. Sweat, elevated body temperature, and limited air exchange create an uncomfortable and potentially unhealthy environment within minutes of starting a workout. This is the single most overlooked element in backyard workout room plans.
Passive Ventilation Basics
At minimum, install soffit vents along the eaves and gable-end vents near the peak. This creates a natural chimney effect where cool air enters low and warm air exits high. A single 16-inch gable vent paired with continuous soffit venting moves enough air for a 10×12 space during moderate workouts. For larger sheds or intense training sessions, add a second gable vent on the opposite wall to create cross-ventilation.
Active Ventilation and Cooling
An exhaust fan rated for at least 200 cubic feet per minute (CFM) per 100 square feet of floor space makes a dramatic difference. A 12×16 gym needs roughly 400 CFM of exhaust capacity. Install the fan high on the wall, ideally on the shade side of the building, and pair it with a low intake vent on the opposite wall. A simple timer or humidity sensor keeps the fan running automatically during and after workouts.
Insulation and Heating
Insulating the walls and ceiling with R-13 fiberglass batts or rigid foam board keeps the space usable year-round. A small 1500-watt infrared heater mounted on the wall handles most cold-weather training sessions in a well-insulated 10×12 shed. For heated floors, a thin electric radiant mat under rubber gym flooring adds comfort without dominating the budget.
Electrical and Lighting Setup for a Functional Gym
Proper electrical planning separates a usable gym shed from a frustrating after-dark workout space. The requirements are straightforward but easy to get wrong if you are not familiar with shed electrical codes.
Lighting That Actually Works
Fluorescent shop lights mounted on the ceiling are the standard for a reason. They provide even, shadow-free illumination across the entire floor space. For a 12×16 gym, two 4-foot LED shop fixtures spaced evenly along the center line deliver roughly 3000 lumens, which is plenty for reading equipment labels, watching a screen, or tracking form in a mirror.
Outlet Placement Strategy
Plan for at least four outlets in a gym shed. Two should be on the wall near where equipment will sit, one near the door for a vacuum or cleaner, and one outdoors if you plan to power anything outside the shed. GFCI protection is required for all outlets in a detached structure. Keep outlets at least 18 inches above the floor to protect against moisture and equipment damage.
Internet and Media Setup
Running Ethernet to the shed is the most reliable way to stream workout videos, use fitness apps, or connect a TV. A single Cat6 cable through the foundation or along the exterior wall is cheaper and more stable than any wireless extender. If running cable is not feasible, a dedicated outdoor Wi-Fi bridge can pull signal from the main house over short distances up to 150 feet.
Common Mistakes to Avoid When Building a Gym Shed
Even experienced builders make predictable errors when converting shed plans for gym use. Learning from these mistakes saves time, money, and a lot of frustration.
Underestimating Floor Load Capacity
A standard shed floor rated for 40 pounds per square foot handles storage fine. A power rack with a barbell loaded to 300 pounds concentrates roughly 150 pounds per square foot on a small section of floor during a squat. Upgrading to 60 PSF rated flooring or adding joist spacing at 16 inches on center prevents bounce, squeaks, and long-term structural stress.
Forgetting About Door Clearance
A standard 36-inch shed door works for equipment entry in an 8×10, but a 4×7 power rack will not fit through it. Measure the widest piece of equipment before finalizing door dimensions. A 60-inch double door or a sliding barn-style door eliminates the headache entirely.
Skipping the Perimeter Check
Most municipalities require a setback of 3 to 10 feet from property lines for accessory structures. Some areas also limit shed size based on lot percentage. Checking local codes before ordering materials prevents costly relocations or permit issues after construction has already started.
Ignoring Natural Light
A windowless gym feels claustrophobic fast. Adding even two small 2×2 foot windows on opposite walls improves air flow perception and reduces the need for artificial lighting during daytime workouts. Skylights or solar tubes are another option that bring in daylight without sacrificing wall space for mirrors or equipment.
Step-by-Step: How to Execute Your Gym Shed Plans
Building a home gym outbuilding follows the same sequence as any shed project, with a few gym-specific adjustments at each stage.
Phase One: Planning and Permitting
Draw a simple floor plan showing equipment placement, door location, vent placement, and outlet positions. Check local zoning for setback requirements and height restrictions. Most residential zones allow sheds up to 120 square feet without a building permit, but rules vary widely by location. Get approval before ordering materials.
Phase Two: Site Preparation and Foundation
Clear vegetation and grade the site level. Lay down landscape fabric to suppress weeds, then install your chosen foundation system. For a pier foundation, set concrete footings below the frost line and place piers on top. For a slab, build forms, lay rebar, and pour concrete on a compacted gravel base.
Phase Three: Framing and Sheathing
Frame the walls on the flat, then raise and brace them. Use 2x4s at 16 inches on center for standard walls and 2x6s at 24 inches on center if you plan to insulate. Sheath the exterior with 7/16-inch OSB or plywood, then apply a weather-resistant barrier like Tyvek before adding siding.
Phase Four: Roof, Doors, and Windows
Build and install the roof framing, then apply roofing material. Asphalt shingles on a low-slope shed roof are straightforward and cost-effective. Install doors and windows at this stage, making sure everything is plumb and sealed against water intrusion.
Phase Five: Interior Finish and Equipment Layout
Install insulation, vapor barrier, and interior wall finish. Run electrical wiring and install outlets and lighting. Lay down rubber gym flooring or interlocking tiles before placing equipment. Leave at least 24 inches of clearance around a power rack for safe barbell handling.
FAQ: Shed Plans for Gym
What size shed is best for a home gym?
A 10×12 shed is the best size for most people. It provides 120 square feet, which fits a power rack, bench, dumbbell storage, and a cardio machine while leaving enough floor space to move freely. Smaller 8×10 sheds work for light training, while 12×16 or larger layouts suit serious lifters who want room to expand equipment over time.
How much does it cost to build a gym shed?
Cost varies significantly based on size, foundation type, and finish level. A basic 10×12 shed with a gravel base, minimal insulation, and no electrical work can cost between $3,000 and $5,000 in materials. Adding a concrete slab, insulation, electrical, and interior finishing typically pushes the total to $6,000 to $10,000. Professional construction adds labor costs on top of those numbers.
Do I need a permit to build a gym shed?
Permit requirements depend on local zoning codes and the size of the structure. Many areas allow sheds under 120 square feet without a permit, but this is not a universal rule. Checking with the local building department before starting construction prevents fines and forced removal. Electrical and plumbing work almost always requires a permit regardless of shed size.
Can I use a pre-built shed kit for a gym?
Yes, a pre-built shed kit can work well for a gym shed as long as you address ventilation, insulation, and floor reinforcement. Most kit sheds come with thin flooring rated for light storage, so upgrading the subfloor and joists is essential before placing heavy equipment inside. Look for kits with at least 2×4 wall framing and a roof pitch that allows for proper insulation.
How do I keep a gym shed cool in summer?
Combining passive and active cooling strategies keeps temperatures manageable. Install soffit and gable vents for natural airflow, add an exhaust fan for forced ventilation, and use reflective roofing material or a light-colored roof to reduce heat absorption. A small window unit air conditioner rated for the shed size handles extreme heat when ventilation alone is not enough.
Next Steps: Turning Shed Plans for Gym Into Reality
The gap between wanting a backyard workout room and having one is usually just planning and a weekend. Start by measuring your available space and sketching a simple layout that accounts for your largest piece of equipment. Check local codes, choose a foundation type that matches your budget and equipment weight, and order plans that include gym-specific details like reinforced flooring and vent placement.
A detached fitness studio built from solid shed plans for gym gives you a permanent training environment that pays for itself within a year of avoiding gym membership fees. The structure that works best is the one that matches your actual equipment list, not the one that looks impressive on paper. Measure twice, plan the foundation carefully, and build it to last.