
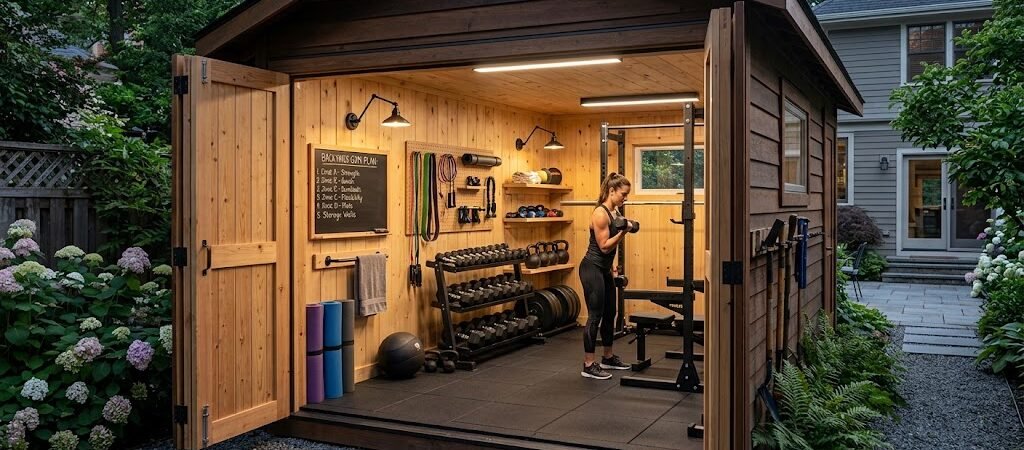
The most popular shed gym plans range from 120 to 240 square feet, costing between $3,000 and $12,000 depending on materials and finishes. A well-planned gym shed gives you a dedicated workout space without the premium of a home addition, and most can be built as a DIY project with basic carpentry skills.
Why is a Shed Gym the Smartest Home Fitness Investment Right Now?
The global home fitness market hit $48.2 billion in 2024, and a growing number of people are skipping expensive gym memberships for something more permanent. A backyard gym shed combines the privacy of a dedicated studio with the flexibility to design it exactly how you want it.
Unlike a garage conversion or basement finish, a detached fitness studio doesn’t require disrupting your living space. You can build it, insulate it, and equip it while your daily routine stays completely untouched. The average cost per square foot for a gym shed runs 40 to 60 percent less than a traditional room addition.
The real advantage comes down to control. You choose the flooring, the lighting, the ventilation, and the layout. No compromises on shared space, no waiting on general contractor schedules, and no surprise structural surprises once the walls go up.
How Big Should Your Gym Shed Actually Be?
Size is the first decision, and it determines everything from foundation cost to equipment capacity. Here’s a realistic breakdown of what each footprint can actually hold:
| Shed Size | Square Footage | Best For | Estimated Cost Range |
|---|---|---|---|
| 8 x 10 | 80 sq ft | Weights, bench, small cardio | $2,500 – $5,000 |
| 10 x 12 | 120 sq ft | Full strength setup, treadmill, storage | $4,000 – $8,000 |
| 12 x 16 | 192 sq ft | Commercial-grade equipment, stretching area | $7,000 – $12,000 |
| 16 x 20 | 320 sq ft | Multi-zone gym, sauna, changing area | $12,000 – $22,000 |
The 10 by 12 foot plan is the sweet spot for most homeowners. It fits a power rack, a flat bench, a dumbbell set, and a mid-size treadmill with walking space around each piece. Anything smaller than 8 by 10 starts feeling cramped once you add a storage wall and a mirror.
Measure your actual yard before committing. A 10 by 12 shed needs at least 14 by 16 feet of clear space when you account for door swing, equipment pull-out clearance, and walking paths. Most building codes also require a 3-foot setback from property lines.
Foundation Options That Actually Work for Gym Sheds
Your foundation choice affects cost, levelness, moisture control, and long-term durability. A gym shed takes significantly more dynamic load than a storage shed — heavy deadlifts, dropping weights, and cardio equipment vibration all stress the floor differently.
| Foundation Type | Cost per Sq Ft | Lifespan | Best Use Case |
|---|---|---|---|
| Concrete slab | $8 – $15 | 25+ years | Heavy equipment, permanent installation |
| Poured concrete piers | $3 – $6 | 20+ years | Uneven terrain, budget-conscious builds |
| Gravel pad | $2 – $4 | 10–15 years | Temporary or seasonal gym setups |
| Deck blocks on compacted soil | $1 – $3 | 5–10 years | Light equipment, small 8×10 sheds |
A poured slab is the gold standard for a home gym outbuilding. It handles the impact of dropped weights, provides a flat surface for rubber flooring, and eliminates moisture wicking from the ground. The downside is the upfront cost and the need for proper drainage grading around the perimeter.
If you’re working with a tighter budget, concrete piers spaced 4 to 6 feet apart with pressure-treated sill plates work well for lighter setups. Just make sure the floor joists are rated for the live load — gym floors need a minimum of 40 pounds per square foot, compared to the 20 PSF standard for storage sheds.
Insulation and Climate Control: What You Can’t Skip
Here’s where most DIY gym shed plans go wrong. Builders focus on the structure and equipment but forget that an uninsulated shed in most climates is unusable for six months of the year. Extreme heat makes cardio unbearable. Cold floors kill motivation and damage certain equipment.
At minimum, insulate your walls and ceiling to R-13 and R-30 respectively. Use closed-cell spray foam or rigid foam board — fiberglass batts absorb moisture and lose R-value when humidity spikes during workouts.
For year-round use, plan for a mini-split HVAC system. A 9,000 BTU mini-split handles a 12 by 16 space efficiently and costs between $1,500 and $2,500 installed. It provides both heating and cooling, which a portable unit never matches reliably.
Ventilation matters just as much. Install a small exhaust fan or passive soffit vents to cycle out stale air and moisture. A 12 by 12 gym with three people working out generates significant humidity — without airflow, you’ll see mold growth on walls within a year.
Essential Features Every Functional Gym Shed Needs
A shed gym isn’t just a box with a treadmill in it. The best designs include specific features that make daily workouts actually comfortable and sustainable:
- Lighting: LED panels at 5,000 Kelvin mimic daylight and keep energy costs low. Plan for at least 2 watts per square foot — a 12 by 16 space needs roughly 384 watts of actual illumination.
- Flooring: Interlocking rubber tiles (3/4 inch minimum) protect equipment, reduce noise, and cushion joints. Rubber costs $3 to $8 per square foot installed.
- Electrical outlets: Install GFCI-protected outlets on every wall. You’ll need power for lighting, equipment charging, phone charging, and potentially a space heater or fan.
- Mirrors: A full wall mirror doubles the perceived space and is essential for form checking. Mount it on a reinforced section of wall framing before drywall goes up.
- Storage wall: Build pegboard or slatwall storage for dumbbells, bands, and accessories. A dedicated storage zone keeps the workout area clear and safe.
Step-by-Step: Building Your Gym Shed From Scratch
Here’s the practical sequence for turning shed plans for gym into a finished space. This assumes you’re starting from a prepared foundation and have basic framing experience:
- Frame the walls: Build walls on the ground using 2x4s at 16-inch on-center spacing. Include double top plates for rigidity. Cut door and window openings before raising — it’s exponentially harder to frame around openings after the wall is vertical.
- Raise and secure: With help, lift each wall into place. Brace temporarily with 2x4s, then screw through the top plate into the rim joist. Check for square with diagonal measurements before permanent fastening.
- Install the roof: A simple gable or shed roof works fine. Use 2×6 rafters spaced 24 inches apart for a 10-foot span. Apply roofing felt and asphalt shingles, or consider standing-seam metal for a lighter, longer-lasting option.
- Sheath and weatherproof: Apply OSB or plywood to walls and roof. Wrap the exterior with a weather-resistant barrier like Tyvek. Flash all penetrations — windows, doors, and electrical conduits — before moving to siding.
- Frame windows and door: A double door (36 inches wide minimum) lets you roll equipment in. Two 24 by 36 inch windows provide natural light and meet most egress requirements if you plan to use the space overnight.
- Insulate and wire: Run electrical before closing walls. Install insulation, then hang drywall or tongue-and-groove pine for a cleaner look. Finish with primer and paint — light colors make small spaces feel larger.
- Floor and finish: Lay a subfloor of 3/4-inch tongue-and-groove plywood. Install rubber flooring, baseboards, and your storage systems. Mount the mirror, lighting, and any wall-mounted equipment.
DIY vs. Pre-Cut Shed Kits: Which Path Saves More Money?
The debate between building from scratch and buying a kit comes down to your skill level, timeline, and budget tolerance. Both approaches can produce a quality gym shed — they just arrive at different price points.
| Factor | DIY from Plans | Pre-Cut Kit |
|---|---|---|
| Material cost | $2,000 – $5,000 | $3,500 – $8,000 |
| Labor | Your time | Your time (less framing) |
| Time to build | 3 – 6 weeks | 1 – 3 weeks |
| Customization | Full control | Limited to kit options |
| Quality risk | Depends on your skill | Factory-consistent |
| Best for | Experienced DIYers | Beginners and time-constrained builds |
DIY plans give you exact control over dimensions, materials, and features. You can specify 2×6 wall framing instead of 2×4, add extra insulation, and design the layout around your specific equipment. The trade-off is time and the learning curve if you’ve never framed a structure before.
Pre-cut kits from companies like Arrow, Suncast, or local shed dealers come with labeled parts and assembly instructions. They’re faster but less flexible. You’re also locked into the manufacturer’s wall thickness and roof pitch, which can limit insulation options and equipment placement.
For a gym that needs to handle heavy loads and daily wear, I’d recommend DIY framing with 2×6 walls at 16-inch spacing. The extra material cost is roughly $400 to $600, but the structural rigidity and insulation capacity are worth it for a space you’ll use every day.
Common Mistakes That Derail Gym Shed Builds
Even experienced builders make these errors, and they’re expensive to fix after the fact. Avoid them by planning ahead:
- Undersizing the door: A 30-inch door sounds fine until you’re trying to roll a 7-foot Olympic barbell rack through it. Go for a 36-inch double door or at minimum a 36-inch single door with a tall header.
- Skipping the vapor barrier: In climates with temperature swings, condensation forms inside walls when warm moist air hits cold framing. A polyethylene vapor barrier on the warm side of your insulation prevents this and protects your investment.
- Ignoring drainage: Water pooling around your foundation is a one-way ticket to rot and mold. Grade the soil away from the shed at a 5 percent slope and install a French drain if your yard is flat.
- Overlooking electrical capacity: A mini-split, lighting, and multiple equipment outlets can easily draw 30 to 40 amps. Run a dedicated 20-amp circuit from your main panel, and consider a 240-volt line if you plan to run a sauna or welder in the future.
- Forgetting about noise transmission: A home gym outbuilding isn’t isolated from your house. Heavy footfalls, dropping weights, and cardio equipment create structure-borne noise. Add mass-loaded vinyl between drywall layers and use resilient channel to decouple the interior finish.
Permits, Codes, and HOA Rules You Need to Check First
Before you order materials or break ground, verify three things: local building codes, zoning setbacks, and HOA restrictions. Skipping this step can result in fines, forced removal, or having to tear down a completed structure.
Most jurisdictions require a building permit for structures over 120 square feet or anything connected to utilities. A 10 by 12 shed with electricity and insulation typically triggers permit requirements. The permit process usually takes 1 to 3 weeks and costs between $100 and $500 depending on your municipality.
Zoning setbacks vary widely. Some areas require 5-foot side setbacks and 10-foot rear setbacks. Others allow sheds in the rear yard with no side restrictions. Check your local code or call your building department — a 15-minute phone call can save you thousands in potential remediation.
HOA rules are the most restrictive layer. Many communities prohibit detached structures over a certain size or require architectural approval before any construction begins. Get HOA approval in writing before you spend a dollar on materials.
Frequently Asked Questions About Shed Gym Plans
Can I build a gym shed without a permit?
In many areas, sheds under 120 square feet that aren’t connected to electricity can be built without a permit. However, adding electrical, insulation, or exceeding the square footage threshold typically requires one. Always check with your local building department before starting.
How much does it cost to convert a shed into a gym?
A basic 10 by 12 gym shed with insulation, flooring, lighting, and basic electrical runs $4,000 to $7,000 in materials. Adding a mini-split, premium rubber flooring, and a full electrical panel upgrade pushes the total to $8,000 to $12,000. Equipment costs are separate and vary widely depending on what you’re buying.
What’s the best flooring for a shed gym?
Interlocking rubber tiles in 3/4-inch thickness are the most popular choice. They’re affordable, easy to install over plywood subfloors, provide impact absorption, and resist moisture. For heavier lifting, consider 2-inch thick rubber rolls in the deadlift zone specifically.
Do I need HVAC in a backyard workout room?
For seasonal use in mild climates, a ceiling fan and cross-ventilation may suffice. For year-round training in most of the US, a mini-split is essential. Without climate control, temperatures inside an uninsulated or poorly insulated shed can exceed 100°F in summer and drop below freezing in winter — both conditions make serious training uncomfortable and unsafe.
How long does it take to build a gym shed?
A skilled DIYer can frame and close a 10 by 12 shed in a weekend. Adding insulation, electrical, drywall, flooring, and finishing typically takes 2 to 4 weekends for an experienced builder. First-time builders should plan 6 to 8 weekends to account for learning curves and weather delays.
Can I use shed plans for a gym as a rental income property?
Some homeowners convert shed gyms into short-term rentals or co-working fitness spaces. This depends entirely on local zoning and short-term rental regulations. Check your municipality’s rules on accessory dwelling units (ADUs) and commercial use before investing in a revenue-generating conversion.
Your Next Steps: From Plans to Finished Gym
Building a gym shed is one of the highest-return home improvements you can make if you approach it methodically. The difference between a space you use daily and one you abandon in three months comes down to planning — not budget size.
Start by measuring your yard and marking the proposed shed footprint with spray paint or string. Live with the placement for a few days. Notice where sunlight hits, where wind patterns push, and whether the location feels accessible enough for daily use.
Next, pull your local building codes and HOA requirements. Write down every restriction before you design anything. This eliminates surprise rejections and keeps your project on track.
Then choose your size based on actual equipment, not aspirational equipment. Measure your biggest piece — usually a power rack or treadmill — and add 3 feet of clearance on every side. That’s your minimum floor plan.
Invest in the foundation and insulation before anything else. These are the hidden layers that determine whether your gym shed lasts 10 years or 30. Everything else — flooring, mirrors, equipment — can be upgraded incrementally. The structure underneath cannot.
If you want professional-grade shed plans for gym that account for load-bearing requirements, electrical routing, and insulation specifications, consider purchasing a detailed plan set from a reputable source or hiring a local designer for a custom layout. The upfront cost pays for itself in avoided mistakes and code violations.
Your backyard gym outbuilding doesn’t need to be massive to be effective. A well-designed 120-square-foot space with proper climate control, rubber flooring, and smart storage will outperform a cluttered 400-square-foot garage corner every single time. Start small, build right, and expand only when you’ve confirmed the space works for your actual routine.