
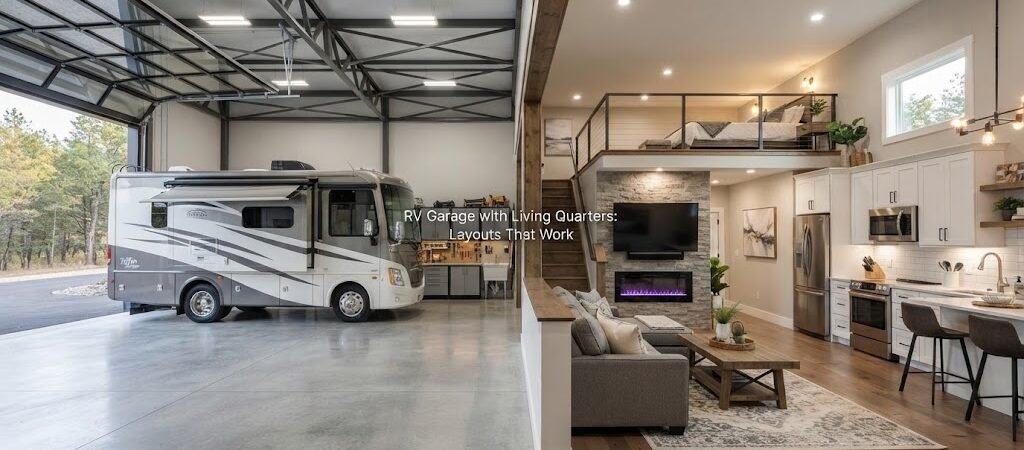
An RV garage with living quarters can do much more than store a motorhome. With the right layout, the same building can give you secure RV storage, a small home, guest space, a workshop, or a place to stay while working on the property.
The trick is separating the uses without wasting valuable floor space. RVs need tall doors, wide turning space, and enough room to open slides and access storage compartments. Living areas need privacy, natural light, plumbing, and comfortable rooms. A good plan makes these parts work together instead of competing for space.
Start With the RV, Not the Living Space
Before choosing bedrooms, kitchens, or bathrooms, figure out the RV bay.
Measure the RV itself, including mirrors, ladders, storage boxes, and anything else that adds width or height. Then think about how much clearance you’ll want around it. An RV that technically fits inside a building may still be difficult to use if the walls are too close.
The garage door also matters. A tall RV usually needs a taller door than a standard vehicle garage, but the exact opening depends on the RV and the door system you choose.
Don’t forget the space outside the building. You’ll need enough room to approach the door and make the turn into the bay. A great floor plan can still be frustrating if the site makes backing the RV inside difficult.

Layout 1: Living Quarters Along One Side
This is one of the simplest layouts for an RV garage with an apartment.
The building is divided lengthwise. One side becomes a tall, open RV bay, while the other side contains the living quarters.
A basic arrangement might include:
- RV parking on one side
- Kitchen and living room near the main entrance
- Bathroom toward the middle
- Bedroom at the quieter end
- Utility or laundry space between the garage and living area
This layout works well because the living space has a simple rectangular shape. Plumbing can also be grouped together instead of being scattered around the building.
A wall between the garage and living area is especially useful for comfort. RV garages can be noisy when doors open, tools are running, or vehicles are moving around. Insulation and proper separation can make the living quarters feel much more like a home.
If you need more ideas for arranging the building itself, comparing different pole barn layouts can help you see how garages, workshops, and living spaces can share one structure.
Layout 2: Apartment Behind the RV Bay
Another option is to place the living quarters at the back of the building.
Imagine a large rectangular garage with the RV entering from the front. The living space occupies the rear section, separated by a wall.
This can be a good choice when you want the RV bay to remain wide and open. It also creates a natural separation between work and living areas.
For example, a deeper building could have the RV parking and workshop space in front, with a kitchen, bathroom, bedroom, and living room behind it.
The main drawback is that the living area may have fewer exterior walls available for windows. Good planning is needed so bedrooms and common rooms still get natural light.
This arrangement can also work nicely for a guest apartment. The RV bay remains useful for storage or hobbies, while the rear apartment can serve family members or visitors.
Layout 3: RV Garage With a Loft
If your building has enough height, a loft can add useful living or storage space without taking over the entire ground floor.
The lower level can hold the RV, vehicles, tools, and equipment. A loft above part of the garage can provide a bedroom, office, recreation area, or additional storage.
This approach is attractive when the property is tight on space, but it requires careful planning. Stairs take up floor area, and the structure must be designed for the loads and intended use.
A loft isn’t automatically the same thing as a full second floor. The structure, stairs, ceiling heights, insulation, windows, and other details need to be planned for the way you intend to use the space.
For a building that combines storage and comfortable living, barndominium plans can also provide useful ideas for organizing open living areas, bedrooms, kitchens, and utility spaces.
Layout 4: RV Bay Plus a Full Apartment
If the building will be used as a part-time or full-time residence, consider giving the living quarters enough room to function like a small home.
Instead of squeezing a bedroom, kitchen, and bathroom into leftover space, design the apartment as its own area.
A practical layout might have the kitchen and living room together in an open area, with the bedroom and bathroom separated from the main living space.
This works especially well for owners who plan to spend extended periods at the property. It can also make sense for a caretaker’s quarters, guest apartment, or temporary housing during construction of a larger home.
The key is deciding early whether the living area is occasional space or a real residence. That choice affects everything from room sizes to windows, insulation, heating and cooling, plumbing, and electrical planning.
Keep the Workshop Close, But Separate
Many RV owners want more than storage. They want a place to work on the RV, maintain equipment, build projects, or store tools.
A workshop can fit beside the RV bay, but try not to let it interfere with the living area.
One useful arrangement is to place the workshop between the RV bay and the living quarters. This creates a buffer between the noisy garage and the quieter rooms.
Another option is to put the workshop at the end of the RV bay. This keeps the main vehicle area open while giving you a dedicated work zone.
If the building will serve as both a garage and a project space, garage and workshop blueprints are worth comparing before you settle on room placement.
Think About RV Slides and Storage
RV slides change how much usable space you need.
An RV may fit comfortably when the slides are closed but become much wider once they’re extended. If you plan to work inside the RV while it’s parked, allow enough room for doors, slides, and walking paths.
Also consider the storage compartments underneath the RV. You’ll want access to them without constantly moving vehicles, tools, or other equipment.
Ceiling height matters too. Besides the RV itself, think about roof-mounted air conditioners, vents, antennas, and other equipment.
A little extra clearance can make the building much easier to use over the years.
Plan the Plumbing in One Area
Keeping kitchens, bathrooms, laundry, and utility equipment reasonably close together can simplify the building’s plumbing layout.
For example, the bathroom could sit next to the kitchen, with the laundry and water heater nearby. This creates a compact service area rather than sending plumbing lines across the entire building.
The exact plumbing design will depend on the site and local requirements, including whether you’re connecting to public utilities or using a private well and septic system.
It’s worth thinking about these systems before the floor plan is finalized. Moving a bathroom on paper is easy. Changing the location of plumbing after construction starts is much harder.
Don’t Forget Entry Doors and Windows
The big RV door isn’t the only door you’ll need.
Give the living quarters their own exterior entrance if possible. This makes the apartment easier to use without walking through the garage.
A separate entry is also useful when the RV bay is being used as a workshop or storage area.
Windows should be planned around furniture, cabinets, privacy, and natural light. Don’t place a window where it will later conflict with kitchen cabinets or other equipment.
The same goes for interior doors. A few inches of extra planning can make a small apartment feel much less cramped.

Choose the Building Size Around Your Real Needs
There’s no single best size for an RV garage with living quarters.
A smaller building might provide one RV bay and a compact apartment. A larger structure could include the RV, cars, workshop space, storage, and a larger living area.
Start by listing everything the building needs to do.
Will it store one RV or two vehicles? Do you need a workshop? Will guests stay there? Do you need a full kitchen? Will the RV be parked inside for months at a time? Do you want room for future equipment?
Once those questions are answered, it’s much easier to sketch the floor plan.
Don’t size the building based only on what fits today. Think about how you’ll use the property five or ten years from now, too.
Plan the Site Before Finalizing the Floor Plan
The building itself is only part of the project.
Check the driveway approach, RV turning area, drainage, utility connections, and available building space. Site conditions can affect where the structure can be placed and how the RV enters it.
Local zoning, setbacks, permits, fire separation, electrical work, plumbing, and other requirements can vary by location. A local building official or qualified professional can tell you what applies to your property.
For structural design, foundation details, and site-specific loads, use plans and engineering appropriate for your location rather than assuming one design works everywhere.
A Simple Way to Test Your Layout
Before committing to a plan, draw the RV bay and living quarters on paper.
Mark the RV at its actual size. Then show the slides extended, doors open, and the walking paths you expect to use.
Add your major furniture, workbenches, cabinets, and equipment.
Now look for conflicts.
Can you open the RV door? Can you reach the storage compartments? Can you walk from the RV to the living area without squeezing between equipment? Can a car pass the parked RV? Is there enough room to work?
This simple exercise can reveal problems before they become expensive changes.
Final Thoughts
The best RV garage with living quarters is usually the one that gives each part of the building a clear job. The RV needs easy access and plenty of working room. The living quarters need privacy and comfort. The workshop needs practical space without taking over everything else.
Start with the RV and site, then work the living area around those needs. Keep plumbing grouped where practical, separate noisy garage space from bedrooms, and leave enough room for the way you actually use the property.
Before drawing everything from scratch, comparing building plan collections can give you a useful starting point for room arrangements, garage sizes, and mixed-use building ideas.
If you’re ready to narrow down the layout, spend some time with pole barn plans and look for designs that match the RV, living space, workshop, and storage needs you expect to have. A good plan can save a lot of guesswork before construction begins.