
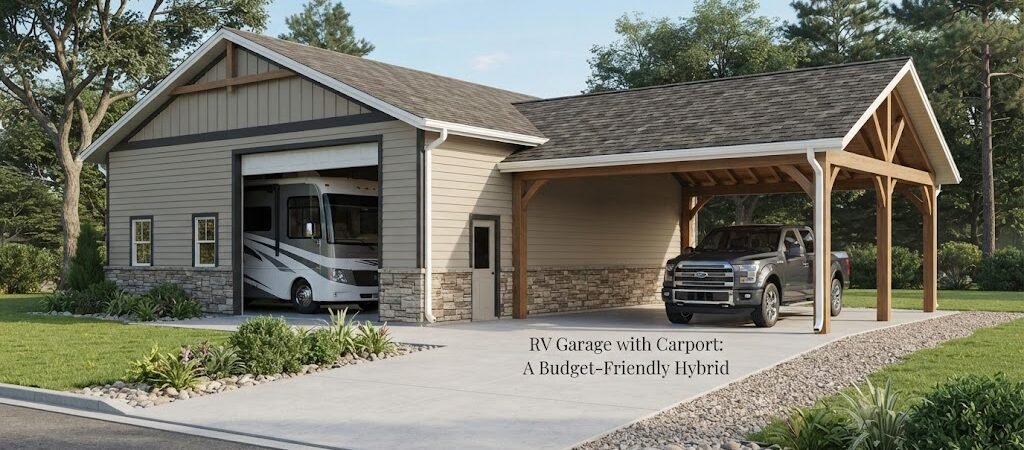
RV Garage with Carport: A Budget-Friendly Hybrid
You’ve got a big RV sitting in the driveway taking up space and baking in the sun. You also need somewhere to park the truck or the family car out of the weather. Building two separate structures sounds expensive because it is. That’s where the RV garage with carport combo comes in. You get enclosed protection for the RV and a covered open bay for daily vehicles, all under one roof. It’s one of the smartest ways to stretch your building budget without cutting corners on the stuff that actually matters.

Why Combine an RV Garage and Carport?
The logic is pretty simple. An RV needs full enclosure. You want walls, a tall door, and a solid roof to keep out sun damage, hail, wind-blown debris, and the critters that love nesting under motorhomes in the winter. A pickup truck or SUV, on the other hand, just needs a roof overhead. It doesn’t need four walls and a garage door.
By combining both under a single roofline, you share one foundation, one roof, and at least one wall. That means less lumber, less metal, less concrete, and less labor than building two separate structures. The carport side stays open and simple, which is where the real savings show up. You’re not paying to enclose space that doesn’t need to be enclosed.
This setup also keeps your property from looking cluttered. One clean building with a tall enclosed bay and an open lean-to side looks a lot better than a garage and a carport sitting next to each other at slightly different angles.
Getting the Size Right
The RV Bay
RVs vary a lot in size, so you need to measure your actual rig before you start planning anything. Class A motorhomes can stretch past 40 feet long and stand over 13 feet tall. Travel trailers might be shorter but can still be wide when the slide-outs are in. Fifth wheels bring their own height challenges.
Door height is the number that catches most people off guard. Most RV garage doors need to be at least 14 feet tall, and plenty of setups call for 16 feet to give you comfortable clearance. The bay width should let you walk around the RV without squeezing, so 16 to 18 feet wide is a common range for the enclosed section. Length-wise, add a few feet beyond the RV itself so you have room to move around the front and back.
The Carport Side
The carport portion is much more forgiving. A standard 12-foot-wide bay handles most trucks, SUVs, and cars without any trouble. If you want to park two vehicles side by side under the carport, you’d bump that up to 20 or 24 feet. The carport doesn’t need walls or a garage door, just posts and a roof. That simplicity is what keeps the cost down.
Layout Options That Work
The most common arrangement puts the enclosed RV bay on one end and the carport extending off the other side. The shared wall between the two sections acts as one side of the carport, so you’re not building an extra wall for no reason. This side-by-side layout works well on wide lots and keeps everything accessible from the same driveway.
If your property is deep but narrow, you might put the carport in front of the RV garage instead. The RV pulls through the covered area and tucks into the enclosed bay behind it. This pull-through style takes more length but can be a great fit for certain lots.
Before you commit to a layout, browsing different pole barn garage plans can help you visualize how the bays fit together and how much room you actually need for turning and maneuvering.
Some people also tuck a small storage room or workshop area between the RV bay and the carport. That’s a nice bonus if you have the space. It gives you a place for tools, camping gear, and seasonal items without eating into the vehicle bays.
Framing and Materials
Most of these hybrids are built as pole barns or metal buildings. Pole barn construction uses pressure-treated posts set into the ground or mounted on concrete piers, and it tends to be the most affordable route for large open spans. The post-frame method handles tall walls and wide openings well, which is exactly what an RV garage demands.
Metal frame kits are another popular option. They go up fast if you have a crew that knows what they’re doing, and the clear-span trusses mean you won’t have interior posts getting in the way of parking.
For the roof, standing seam metal is the go-to for durability and low maintenance. You want enough pitch to shed snow and rain effectively, and the right pitch depends on your local climate. The enclosed RV bay will benefit from insulated panels or an interior liner if you plan to spend time inside during cold months. The carport side can stay open and bare-bones.
If you’re weighing wood-frame versus steel construction, comparing metal building plans alongside traditional pole barn designs will give you a clearer picture of what each approach involves and where the cost differences show up.
What This Actually Costs
I’m not going to throw out a specific dollar amount because it would be misleading. The price depends on too many variables: your region, the size of the building, local material and labor rates, whether you’re pouring a full concrete slab, and how much of the work you’re doing yourself.
What I can tell you is that the carport portion costs significantly less per square foot than the enclosed RV bay. You’re skipping walls, insulation, and a tall overhead door on that side. A fully enclosed two-bay garage big enough for an RV and a truck would cost noticeably more than the same footprint with one open carport side. That gap is where the “budget-friendly” part of the title comes from.
Get at least two or three quotes from local builders who have real experience with tall-door structures. RV garages are not the same as standard two-car garages, and not every contractor is comfortable framing a 16-foot door opening or engineering the header that goes above it.
Things to Sort Out Before You Build
Permits and zoning come first. Some areas have height restrictions that can complicate an RV garage since you need that tall door and a roof peak above it. Check with your local building department before you get too deep into planning. It’s a lot cheaper to adjust your design on paper than to argue with an inspector after the posts are in the ground.
Drainage matters more than most people expect. An RV garage roof covers a big surface area, and all that rainwater has to go somewhere. Make sure your site is graded so water moves away from the building and doesn’t pool under the carport. Standing water under a carport turns into ice in the winter and mud the rest of the year.
Think about access and turning radius. You need enough room to pull the RV in and out without a 20-point turn. If your lot is tight, a pull-through design or a wider driveway apron might be worth the extra concrete.
If your project is starting to feel complicated, working from a set of garage and workshop blueprints can save you a lot of headaches. Having actual plans in hand makes the permit process smoother and helps your builder understand exactly what you want before anyone starts digging holes.

A Few Final Thoughts
An RV garage with a carport is one of those projects that just makes sense once you see it laid out. You protect your biggest investment from the elements, you keep the daily driver out of sun and snow, and you do it without paying to enclose space that doesn’t need walls. It’s practical, it’s efficient, and it fits a wide range of property layouts.
Take your time with the planning stage. Measure your RV, walk your lot, and think about how you’ll actually use the space day to day. When you’re ready to move forward, starting with a solid set of pole barn plans will give you a clear roadmap from design to finished building.