
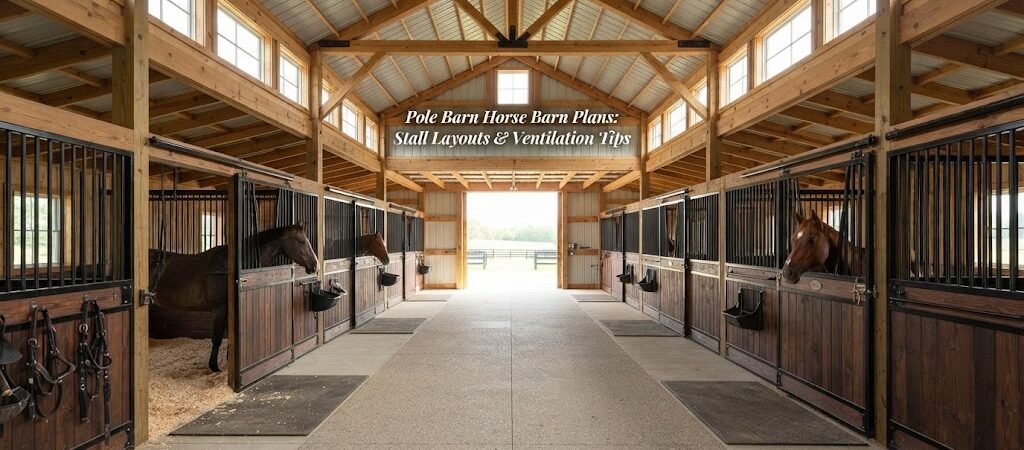
A pole barn can make a practical horse barn, but the basic building shell is only the starting point. Horses need a safe stall layout, good airflow, dry footing, easy access to feed and water, and enough room for people to work without getting in the way of the animals.
A good plan also saves headaches later. Moving stalls, doors, tack areas, or ventilation openings after construction can be difficult and expensive. Before you order materials or start digging post holes, spend some time thinking through how the barn will actually be used.
If you’re still comparing layouts, looking through different pole barn plans can help you see how stalls, storage, and work areas can fit inside the same basic structure.
Start With How You’ll Use the Horse Barn
The right layout depends on the number of horses and what you want to do inside the building.
A small barn may only need a few stalls, a feed area, and room for equipment. A larger horse barn might include a tack room, wash area, hay storage, grooming space, and an aisle wide enough for moving horses safely.
Think about daily chores first. Where will you bring a horse into the barn? Where will you store feed? How will you move hay from storage to the stalls? Where will manure and dirty bedding go?
It helps to picture a normal morning from start to finish. If you have to walk through several stalls just to reach the feed room, the plan probably needs work.
A simple floor plan is often enough to spot these problems before construction begins.

Common Pole Barn Stall Layouts
Straight row of stalls
A straight row is one of the simplest choices. Stalls line one side of an aisle, leaving the opposite side open for storage, grooming, or equipment.
This works well for smaller barns because it keeps the layout easy to understand. It also gives you a clear path for moving horses.
The downside is that the building can become less efficient as the number of stalls grows. You may end up with a long aisle and unused space along the opposite wall.
Center aisle layout
A center aisle puts stalls on both sides of a main passage.
This is a popular arrangement because the aisle can serve as the main working area. Feed, grooming, and daily horse care can all happen in one central space.
The aisle needs to be planned around actual use, though. A passage that’s fine for walking may feel cramped when you’re leading a horse, carrying equipment, or working with a wheelbarrow.
Door placement matters here, too. Large exterior doors at the ends or sides can make the barn easier to access with a tractor, trailer, or load of bedding.
Two-sided or mixed-use layout
Another option is to put stalls on one side and storage or utility areas on the other.
This can be useful when the barn needs to do more than house horses. A section might be used for hay, tools, a workbench, or farm equipment while the horse area stays separate.
If you’re planning a building that combines vehicles and workspace, reviewing garage and workshop blueprints can also give you ideas for organizing the non-horse areas.
Choosing Stall Dimensions
There isn’t one stall size that works for every horse or situation. The horse’s size, stall use, door arrangement, and local requirements all matter.
As a general planning reference, many owners look at stalls around 10 by 10 feet or 12 by 12 feet, with larger spaces often preferred for bigger horses or broodmares. These numbers should be treated as planning starting points, not universal requirements.
A stall should allow the horse to stand, lie down, turn, and move comfortably without unnecessary obstacles.
Don’t forget the stall door. A stall can have plenty of floor space and still be awkward if the door opens into a busy aisle or creates a tight corner.
You’ll also need to think about the height and construction of partitions. They should be sturdy enough for normal horse use, with materials and openings selected to reduce the chance of injury.
Plan the Aisle Around Real Work
The aisle is more than empty space between stalls.
You’ll use it for leading horses, carrying feed, cleaning stalls, grooming, moving bedding, and possibly bringing equipment into the barn. A narrow aisle can make everyday work frustrating.
Think about the largest thing that needs to move through it. If a tractor, cart, or horse trailer needs access, plan doors and aisle space accordingly.
Large doors can also improve airflow during suitable weather. Just make sure their placement doesn’t create a dangerous traffic path for horses.
Ventilation Should Be Part of the Plan
Good ventilation is essential in a horse barn. Horses produce heat and moisture, and manure and bedding can add odors and airborne particles. A closed-up building with poor airflow can quickly become unpleasant.
The goal isn’t simply to make the barn “airy.” You want steady air exchange without creating strong drafts directly on horses.
Use natural airflow
Pole barns are often well suited to natural ventilation because they can incorporate large wall openings, ridge vents, soffit vents, windows, or adjustable openings.
Warm, moist air naturally tends to rise. A high opening near the roof can give that air a way out, while lower openings allow fresh air to enter.
The exact vent arrangement depends on the building design and local climate. A barn in a hot, humid area may need a different approach than one in a cold, windy location.
Think about the roof
Roof ventilation deserves attention during the planning stage. A properly designed ridge or high-level ventilation system can help release warm, moist air from the upper part of the barn.
Avoid treating roof vents as an afterthought. Their location should work with the rest of the building’s airflow.
Use windows and wall openings wisely
Windows can provide daylight and fresh air, but they shouldn’t be the only ventilation strategy.
Adjustable openings are useful because you can change airflow as weather conditions change. Screens or protective barriers may also be needed depending on the opening and what animals can reach.
In colder weather, the temptation is to close everything tightly. That’s understandable, but completely shutting off airflow can allow moisture and stale air to build up. The right balance depends on the building and climate.
Keep Moisture Under Control
Ventilation works best when the barn also has good drainage and moisture management.
Water entering through doors, wet bedding, poor site drainage, or condensation can create problems even in a well-ventilated building.
Pay attention to the building site before construction. The barn should be planned so rainwater drains away from the structure rather than toward stalls or work areas.
Inside, stall floors and bedding should be managed so moisture doesn’t sit where horses spend their time.
Don’t Forget Hay and Feed Storage
Hay storage needs careful planning because you don’t want to create unnecessary traffic through the horse area.
If possible, think about a route that lets you bring hay into storage without leading through occupied stalls. The same idea applies to feed deliveries and removing bedding.
Keep hay and other materials stored in a way that fits your local fire-safety practices and the building’s design. The details can vary by location and building type, so local requirements should be checked before construction.
Lighting and Electrical Planning
Natural light can make a horse barn much more pleasant to use during the day. Windows, translucent roof or wall panels, and properly placed doors can reduce the need for artificial lighting.
Electrical planning should happen before the walls and stalls are finished. Consider lights over aisles, feed areas, tack storage, grooming areas, and entrances.
Any electrical equipment around animals, water, and dust needs appropriate protection and installation. A qualified electrician can help determine what is suitable for your specific barn.

Leave Room for Future Changes
Your horse barn may not be used exactly the same way five or ten years from now.
You might add another horse, need more storage, bring in a tractor, or decide that a section of the barn should become a workshop. A little flexible space can make those changes easier.
This is also why it helps to compare several pole barn plans and building plan collections before settling on one layout. You may find a simple idea in another plan that solves a problem you hadn’t considered.
A Simple Planning Approach
Before finalizing your horse barn plans, sketch the building from above. Mark every stall, exterior door, interior door, aisle, feed area, hay storage space, and utility area.
Then walk through the plan mentally.
Can you lead a horse from outside to its stall without crossing a crowded work area? Can you get hay where it needs to go? Can you clean stalls without constantly moving equipment around? Does fresh air have a reasonable path through the building?
Also consider where the sun, prevailing winds, rain, and snow affect the site. These factors can influence door placement, windows, overhangs, and ventilation.
For a building with unusual loads, challenging site conditions, or special uses, have the structural and site details reviewed by the appropriate local professional. The exact post sizes, framing, foundation, roof design, and connections should be based on the actual building and local conditions rather than copied from a generic example.
Build the Layout Around the Horses and the Work
A good pole barn horse barn doesn’t need to be complicated. The best plans usually come from thinking through ordinary chores before construction starts.
Give horses enough usable stall space, keep traffic paths practical, provide safe storage, and design ventilation into the building instead of trying to add it later. Small planning decisions can make a big difference in how easy the barn is to use every day.
If you’re ready to compare layouts before choosing a design, browse pole barn plans and look for a floor plan that matches the way you actually work with your horses.