
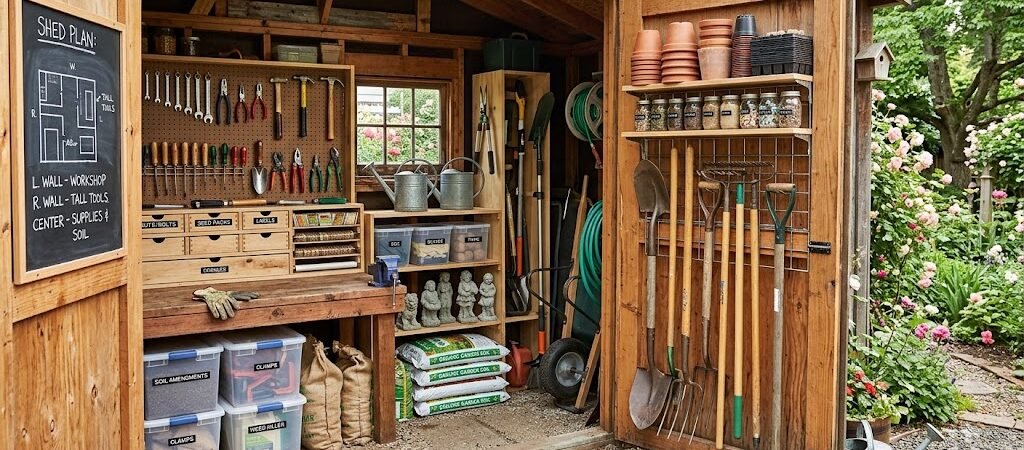
The best garden shed plans combine a clear tool shed layout with dedicated zones for pots, supplies, and equipment—keeping everything organized without wasting square footage. Smart small garden storage designs can cut your build cost by 30 to 50 percent compared to buying a pre-fabricated shed, especially when you plan your tool shed layout before breaking ground.
Why Do Garden Shed Plans Save You Money and Stress?
Buying a prefab shed might seem faster, but it rarely fits your actual space or storage needs. Most pre-built units leave you with awkward gaps, missing shelves, and tools piled on the floor by month two.
Custom garden shed plans change that equation entirely. You design the interior around your specific inventory—long-handled tools on one wall, potting supplies on another, heavy equipment in the center. The result is a backyard storage building that actually works for you.
According to the National Association of Home Builders, the average cost to build a detached garden shed ranges from $1,500 to $4,500 depending on size and materials. A comparable prefab unit runs $2,000 to $6,000—and that’s before you add shelving, workbenches, or lighting upgrades. Building from plans typically comes out 20 to 40 percent cheaper while giving you a layout tailored to your exact needs.
How to Maximize Small Garden Storage
Small garden storage doesn’t mean sacrificing capacity. The trick is vertical organization and multi-purpose zones. A 6-by-8-foot shed can hold more than you’d think if the tool shed layout is designed correctly.
Start by mapping your inventory. List every category: hand tools, power tools, hoses, pots, soil, fertilizer, gloves, and seasonal items. Measure the longest and widest pieces. This determines your shelf heights, hook placements, and aisle width before you cut a single board.
Here’s a practical small garden storage layout for a 6×8 shed:
- Left wall (6 feet): Floor-to-ceiling pegboard for hand tools. Hang rakes, shovels, hoes, and pruners at eye level. Add a small shelf at 36 inches for frequently used items like trowels and weeding forks.
- Right wall (6 feet): Deep shelving for pots and supplies. Bottom shelf holds stacked nursery pots. Middle shelves store soil bags, fertilizer, and mulch. Top shelf keeps lightweight items like plant markers and ties.
- Back wall (8 feet): A 4-foot-wide workbench with storage underneath. The workbench surface handles potting and repairs. Drawers and cubbies below hold smaller supplies.
- Floor space: Leave a 24-inch central aisle. Store larger items like wheelbarrows or lawn mowers near the door for easy access.
This layout uses approximately 85 percent of your available wall space for storage while keeping the floor clear for movement. That’s the difference between a cluttered storage shed and a functional workspace.
What Are Potting Shed Plans and Why Do You Need Them?
If you’re serious about gardening, potting shed plans deserve their own category. A dedicated potting area inside your shed transforms a chaotic spring into a smooth workflow.
The core of any potting shed plan is the work surface. Build a bench at 34 to 36 inches high—this is the standard ergonomic height for standing work. Include a 2-inch lip around the edge to catch spilled soil. Add a sink if your budget and plumbing allow; even a small utility sink eliminates trips to the house for water.
Below the bench, organize by function:
- Bottom drawer: Seeds, bulbs, and small planting supplies in labeled containers.
- Middle shelf: Potting mix, perlite, and compost in sealed bins.
- Side cubby: Empty pots waiting to be filled, stacked vertically to save space.
- Hanging rack above bench: Repotting tools, sprayers, and plant labels within arm’s reach.
Lighting matters more than most people expect. A potting shed needs at least 200 lux on the work surface—roughly one LED panel per 4 feet of bench length. Natural light from a small window helps, but artificial lighting ensures you can pot through late afternoons in winter.
Consider a potting shed plan that includes a drainage area. Place a shallow tray or removable grate under the workbench to catch runoff. It simplifies cleanup and keeps the shed floor dry.
How to Zone Your Tool Shed Layout for Efficiency
A well-planned tool shed layout separates items by frequency of use and size. Your most-used tools should be at waist height and within arm’s reach. Heavy or seasonal items go lower or further back.
Here’s a tool shed layout optimized for a 8×10 shed:
| Zone | Location | Storage Type | Items |
|---|---|---|---|
| Daily Use | Eye level, front wall | Pegboard with hooks | Hand tools, pruners, gloves |
| Weekly Use | Mid-height shelving, side wall | Open shelves with bins | Hoses, sprinklers, rakes |
| Seasonal | Top shelves or back corner | Labeled storage bins | Leaf blower, snow shovel, holiday lights |
| Heavy Equipment | Floor near door | Floor space + wall mount | Wheelbarrow, lawnmower, trimmer |
| Long Tools | Full-height rack, back wall | Vertical tool rack | Shovels, hoe handles, long poles |
This zoning system means you stop digging through piles to find what you need. Every tool has a designated home, and you can see everything at a glance when the door opens.
For power tool storage, build a simple foam copy system. Cut shapes into high-density foam to hold each tool in place. The visual gap makes it obvious when something is missing—critical for a small business owner who needs every tool on job day.
What to Consider for Your Backyard Storage Building
Before you draw a single line on paper, answer three questions about your backyard storage building: What will it hold? Where will it sit? What are the local size restrictions?
Most residential zones allow sheds up to 120 square feet without a permit. That’s a 10×12 or 12×10 structure. Going larger usually triggers permit requirements, setback rules, and possibly foundation inspections. Check your local code before finalizing your garden shed plans.
Placement affects usability more than aesthetics. Position your shed so the door faces the direction you’ll approach it most often. If you’re hauling soil bags from the driveway, the door should face that direction. If the shed is a potting and prep station near your garden beds, face it toward the garden.
Foundation choice also impacts cost and durability:
| Foundation Type | Cost Range (8×10) | Durability | Best For |
|---|---|---|---|
| Gravel pad | $200–$400 | 5–10 years | Light sheds, temporary installations |
| Concrete pavers | $300–$600 | 10–20 years | Medium sheds, level ground |
| Poured concrete slab | $800–$1,500 | 20+ years | Heavy sheds, workshops, wet climates |
| Treated wood frame | $400–$800 | 10–15 years | Sloped or uneven terrain |
A gravel pad is the most cost-effective option for basic garden shed plans. But if you’re building a full backyard storage building with heavy equipment and a workbench, a concrete slab prevents settling and keeps doors aligned for years.
What Are Some Cost-Saving Tips for Your Garden Shed Build?
Building your own garden shed plans doesn’t require a huge budget. These strategies keep costs down without cutting corners on structural integrity.
- Use standard lumber dimensions. Design your shelf heights and bay widths around 4-foot and 8-foot board lengths. Cutting waste drops to near zero when your plans match what you can buy off the shelf. Non-standard dimensions create scrap and extra trips to the supplier.
- Source reclaimed materials strategically. Salvaged pallets work well for shelf backing and floor underlayment. Used doors and windows can cut material costs significantly. Check local salvage yards, Habitat ReStores, and online marketplaces before buying new.
- Skip the finished interior. Interior walls don’t need drywall or paint. T1-11 siding on the inside is durable, affordable, and looks clean enough for a functional shed. Reserve finished materials for the exterior where they matter.
- Build your own doors. Pre-hung shed doors are convenient but expensive—often $300 to $600 for a double door set. Building a simple barn-style door from 2x4s and T1-11 costs about $80 in materials. The hardware (hinges and latches) runs another $40 to $60.
- Delay the flooring finish. A bare subfloor works fine for most storage needs. Add epoxy or interlocking tiles later if the floor becomes a traffic surface. This spreads cost over time and lets you see how the space actually gets used before investing in finishes.
- Buy shelving hardware in bulk. Shelf brackets, drawer slides, and pegboard hooks are cheap individually but add up. Purchase a 20-pack of brackets instead of ten single packs. The per-unit savings compounds across a full tool shed layout build.
How Do Different Garden Shed Plans Compare?
Not every shed needs the same configuration. Here’s how three common garden shed plans compare for different storage priorities:
| Layout Type | Best Shed Size | Primary Use | Estimated Build Cost | Storage Capacity |
|---|---|---|---|---|
| Compact potting shed | 6×8 feet | Potting, small tools, seeds | $800–$1,400 | Light—hand tools and pots |
| Standard tool shed | 8×10 feet | Tool storage, workbench, supplies | $1,200–$2,200 | Medium—full hand and power tool collection |
| Full backyard storage building | 10×12 feet | Everything—tools, equipment, seasonal items | $1,800–$3,500 | High—complete garden and yard inventory |
The compact potting shed works if your main need is a clean workspace for planting and a place to park hand tools. The standard tool shed covers most residential needs. The full backyard storage building is the right call if you manage multiple properties, run a landscaping side business, or simply have too much gear for anything smaller.
What Common Mistakes Should You Avoid in Garden Shed Plans?
Even experienced builders make these errors when drafting garden shed plans. Avoiding them saves time, money, and frustration.
Forgetting door swing clearance. A double door needs at least 36 inches of clearance on both sides to open fully. Measure your intended doorway location before finalizing the layout. A door that can’t open means you can’t get the wheelbarrow in.
Skipping ventilation. A sealed shed becomes a humidity trap. Moisture warps wood, rusts tools, and grows mold on stored fabric and paper. Include at least two vents—one near the floor and one near the peak. A $15 soffit vent and a $12 gable vent handle most 8×10 sheds.
Designing shelves without considering weight. Standard 3/4-inch shelf pin supports hold about 30 pounds per shelf. Soil bags, cast iron pots, and bulk fertilizer exceed that quickly. Use 1×12 boards with mid-span supports or install heavy-duty shelving brackets rated for 50 pounds per linear foot.
Ignoring future needs. Your current tool collection is only part of the story. If you plan to add a trimmer, a pressure washer, or a compost tumbler, leave space for them now. An extra 12 inches of floor space or one additional shelf row costs almost nothing during construction but saves a costly rebuild later.
Frequently Asked Questions About Garden Shed Plans
Do I need a permit for garden shed plans?
Most municipalities require a permit for sheds over 120 square feet. Smaller structures typically don’t need one, but setback requirements still apply—usually 5 to 10 feet from property lines. Check with your local building department before starting.
What’s the cheapest garden shed plan to build?
A 6×8 lean-to shed built against an existing wall is the most budget-friendly option. It requires only three walls, a simplified roof, and minimal foundation work. Material costs run $600 to $1,000 with basic lumber and asphalt shingles.
How do I organize a small garden storage shed?
Use vertical wall space with pegboard and slatwall. Install adjustable shelving for pots and supplies. Keep floor space clear for large items near the door. Label every bin and shelf so you can find things in under 10 seconds.
Can I convert an existing shed into a potting shed?
Absolutely. Add a workbench at 34 to 36 inches, install a sink if plumbing is accessible, and build shelving for soil and pots. The conversion typically costs $200 to $500 depending on how much you add.
What size garden shed is best for a small backyard?
A 6×8 or 8×10 shed fits most small backyards while providing meaningful storage. Measure your available space and subtract 3 feet on all sides for maintenance access. The remaining area is your maximum shed footprint.
How long do garden shed plans last?
A well-built shed with a concrete or paver foundation and treated lumber lasts 20 to 30 years. Roof maintenance—re-shingling every 15 years—extends that significantly. Lower-quality materials and direct ground contact cut lifespan to 10 to 15 years.
Your Garden Shed Action Checklist
Before you start cutting lumber, run through this checklist to make sure your garden shed plans are solid:
- Measure your space—confirm dimensions and check for overhead wires, underground utilities, and tree roots.
- Check local codes—verify permit requirements, setback rules, and height restrictions with your municipality.
- Inventory your gear—list every tool, pot, and supply category with approximate dimensions and weight.
- Choose your layout—decide between compact potting shed, standard tool shed, or full backyard storage building based on your inventory.
- Design zones—assign wall space and floor areas for daily-use tools, weekly supplies, seasonal items, and heavy equipment.
- Calculate materials—create a cut list using standard lumber lengths to minimize waste and trips to the supplier.
- Plan ventilation—include at least two vents and consider a small exhaust fan if the shed will hold sensitive tools.
- Budget realistically—add 15 to 20 percent contingency for unexpected costs like hardware upgrades or foundation repairs.
- Review your plans—walk through the layout one more time. Check door clearance, shelf weight ratings, and aisle width before breaking ground.
The difference between a shed that works and one that becomes a dumping ground comes down to planning. Your garden shed plans should reflect how you actually use the space—not how you hope you’ll use it. Map your tools, size your shelves, and build for the workflow you already have. The result is a backyard storage building that stays organized for years, not just months.