
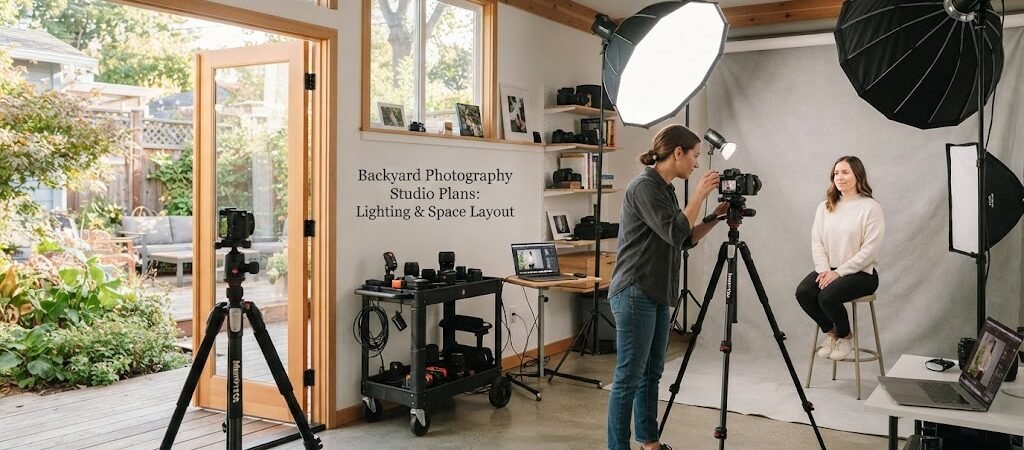
Backyard Photography Studio Plans: Lighting & Space Layout
Building a detached photography studio in your backyard is a huge step. You get away from the noise of the main house. You get a dedicated space to create. But a photography studio isn’t just a regular home office. It has very specific needs. The two biggest things you need to get right are lighting and space layout. A solid plan balances a large, clear shooting area with controlled natural light and plenty of electrical power. Let’s look at how to design a backyard studio that actually works for your craft.

Getting the Natural Light Right
Light is your most important tool. When you plan your backyard studio, window placement is everything.
North-facing windows are usually the best choice. They give you soft, even, and consistent light all day long. South-facing windows bring in bright, direct sunlight. That can be too harsh for portraits unless you plan for heavy diffusion blinds.
Think about how high you place those windows. You want them high up on the wall. This leaves the lower wall space open for backdrops, seamless paper, and lighting stands.
Skylights are another great option. They provide nice overhead fill light. Just make sure you get ones with good UV blocking and blinds so you can control the light when needed.
Planning the Space Layout
A good studio layout divides the room into clear zones. You don’t want your editing desk sitting right in the middle of your shooting area.
The Shooting Zone
This needs to be the largest part of your building. You need clear floor space to move around your subject. Ceiling height is critical here. Aim for at least nine or ten feet. You need that extra height for light stands, boom arms, and overhead softboxes. A low ceiling will severely limit what you can do with your lighting.
The Editing and Admin Zone
You need a separate area for editing photos and managing your business. This zone needs controlled light. You don’t want bright sunlight glaring on your computer monitor. Place this area in a darker corner of the studio. You can also use a simple partition or a tall bookshelf to separate it from the main shooting zone.
Client Space and Storage
If clients visit your studio, give them a place to sit and relax. A small seating area with a couple of comfortable chairs makes a big difference.
Storage is just as important. Photography gear is bulky and fragile. Plan for deep closets or built-in cabinets. You need space for backdrops, light stands, props, and camera bodies. Keep heavy items low and fragile items up high.
Setting Up Artificial Lighting
Natural light is great, but you need artificial light too. Plan your ceiling for lighting grids or heavy-duty hooks. You might want to mount softboxes or overhead strobes. Make sure your ceiling joists can support the weight. If you plan to hang heavy gear, you might need to add extra blocking in the ceiling during the framing stage.
Power and Electrical Needs
Photography equipment uses a lot of electricity. A standard office electrical plan won’t cut it.
You need dedicated circuits for your heavy strobes and continuous lighting. If you plug too many powerful lights into one circuit, you will trip the breaker right in the middle of a shoot.
Plan for plenty of outlets. Floor outlets are incredibly helpful in a studio. They let you run power to light stands without creating tripping hazards across the room. Track lighting on the ceiling is also a smart move for general ambient light.
Internet and File Transfers
Photography files are huge. You need a rock-solid internet connection. Since the studio is detached, don’t rely on a weak Wi-Fi signal from the main house. Run a dedicated ethernet cable to the building. If that isn’t possible, look into a high-quality point-to-point wireless bridge. You need fast upload speeds to send large galleries to clients.
Making the Studio a Flexible Backyard Retreat
Sometimes a studio needs to be more than just a strict workspace. You might want it to feel like a creative retreat. Or maybe you need a space where visiting clients can relax and feel comfortable between shoots.
If you want your backyard building to serve as a flexible creative space or a relaxing guest area, exploring pool house and cabana plans can give you great ideas for open, airy layouts that feel more like a retreat than a standard office.
You could also borrow ideas from a cabin plans collection if you want a cozy, rustic vibe for your portrait sessions. Wood accents and warm finishes can make a studio feel much more inviting.
Insulation and Climate Control
Cameras, lenses, and computers hate extreme temperatures and high humidity. Good insulation keeps your gear safe. It also keeps your clients comfortable during long shoots.
Insulate the walls, floor, and ceiling properly. For heating and cooling, a mini-split HVAC system is usually the best choice for a detached backyard building. It’s quiet, efficient, and lets you control the temperature exactly. Make sure the indoor unit is placed where it won’t blow air directly onto your subject or your gear.
Site Placement and Foundation
Where you put the studio on your property matters just as much as the layout inside. Think about the path of the sun. You want the building positioned so your main windows get the best natural light without being blocked by trees or the main house.
For the foundation, a concrete slab is usually the best choice for a photography studio. It gives you a perfectly flat, solid floor. This is important when you are rolling heavy light stands or setting up a seamless backdrop.
Sound and Privacy
If you shoot video or need absolute quiet, think about soundproofing. Detached backyard offices naturally have an advantage here because they are away from the main house.
Use solid core doors instead of hollow ones. Add extra insulation in the interior walls if you need to block outside noise. Planting a row of dense shrubs around the outside of the studio can also help block noise from the street or neighbors.
Wrapping Up Your Studio Plans
Designing a backyard photography studio takes careful thought. You have to balance the need for bright, open space with the need for controlled, dark areas for editing. Take your time with the floor plan. Think about how you actually work. Measure your tallest light stands and make sure your ceiling can handle them.
If you decide you want to add a small client lounge, a half-bath, or even a tiny kitchenette to make the space fully self-contained, an ADU and small home blueprint guide can help you think through a more complete detached layout.
Getting the layout and lighting right from the start means you will have a space that inspires you every time you walk through the door.