
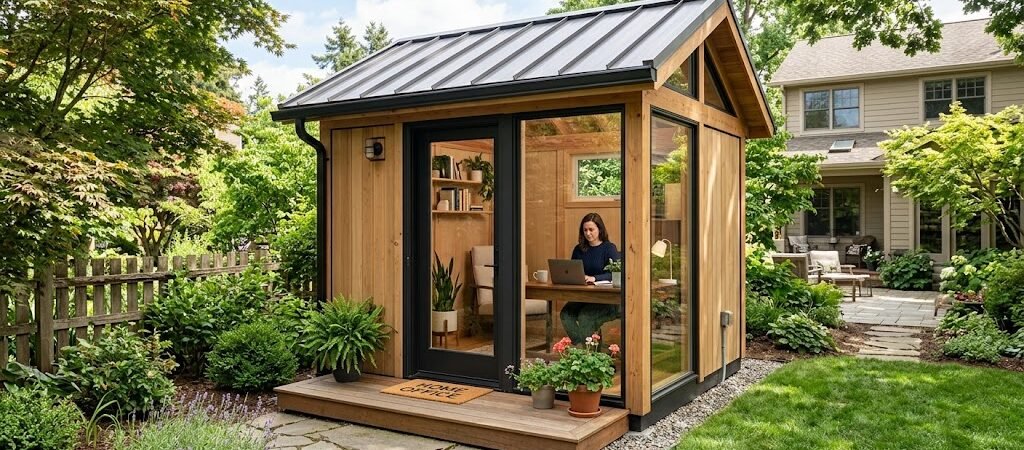
Backyard office shed plans provide a practical, cost-effective solution for creating a dedicated, professional workspace separate from your home. These detached structures typically range from 120 to 240 square feet, with build costs between $15,000 and $35,000, offering a permanent, insulated office that boosts productivity and increases property value.
The Remote Work Revolution and the Case for a Detached Office
The shift to remote work isn’t a trend; it’s a structural change in how we operate. A 2023 report from the U.S. Bureau of Labor Statistics indicates that approximately 28% of employed Americans now work remotely at least part of the time. For many, the kitchen table or a corner of the bedroom has become a functional, yet deeply unsatisfying, office. The mental boundary between “work” and “home” blurs, leading to burnout and decreased focus.
This is where backyard office shed plans solve a critical problem. A detached structure provides a physical and psychological separation. You leave your house, walk to your office, and begin your workday with intention. When you walk back inside, you’re home. This simple ritual can dramatically improve work-life balance and professional output.
Phase 1: Planning & Design – Laying the Blueprint
Before you buy a single board, you need a clear plan. This phase is about defining your space, budget, and vision. Skipping it leads to costly mistakes and frustrating compromises.
1. Define Your Space Requirements
Start by measuring your available backyard space. A standard 12×20-foot shed (240 sq ft) comfortably fits a desk, filing cabinets, and a small seating area. For a more spacious studio shed workspace, consider a 12×24 or 16×20 layout. Think about your workflow: do you need room for a printer, extra storage, or a small bookshelf?
2. Choose a Design Style
Garden office design offers incredible flexibility. You can opt for a modern, minimalist box with large windows, a traditional shed with a gable roof, or a sleek, A-frame design. The style should complement your home’s architecture while reflecting your personal taste. Consider roof pitch, window placement, and exterior materials (vinyl, wood, or metal) to ensure it feels like a natural extension of your property.
3. Establish a Realistic Budget
Understanding the cost range is crucial. Here’s a breakdown for a 240-square-foot detached backyard office:
| Component | Estimated Cost (Materials Only) | Notes |
|---|---|---|
| Foundation (Concrete Slab) | $2,500 – $4,000 | Permits and site prep may add to this. |
| Floor Framing & Sheathing | $1,500 – $2,500 | Pressure-treated lumber is recommended. |
| Wall Framing & Siding | $3,000 – $5,000 | Vinyl or engineered wood siding is low-maintenance. |
| Roofing (Shingles & Underlayment) | $2,000 – $3,500 | Architectural shingles offer durability. |
| Windows & Doors | $1,500 – $3,000 | Energy-efficient, double-pane units are essential. |
| Insulation & Vapor Barrier | $800 – $1,500 | R-13 walls, R-19 ceiling for year-round use. |
| Electrical & Lighting | $1,000 – $2,000 | Includes wiring, outlets, and fixtures. |
| Interior Finishes (Drywall, Paint) | $1,000 – $2,000 | Keeps the space clean and professional. |
| Total Estimated Cost | $13,300 – $23,500 | Does not include permits or professional labor. |
Pro Tip: To save significantly, consider a kit shed as a base. These pre-cut, pre-drilled packages can reduce material waste and simplify the build process, often cutting total costs by 15-20%.
Phase 2: Permitting & Site Preparation – The Legal Foundation
Building a detached backyard office is a construction project, and that means navigating local regulations. This step is non-negotiable and varies by municipality.
1. Check Zoning and Building Codes
Before you break ground, contact your local building department. Inquire about:
- Setback Requirements: How far must the structure be from your property lines?
- Height Restrictions: Most areas limit accessory structures to 12 feet or less.
- Permit Requirements: Most jurisdictions require a building permit for any structure over a certain square footage (often 120 sq ft) or if it’s connected to utilities.
Building without a permit can result in fines, forced removal, and complications when selling your home. Always prioritize compliance.
2. Secure Necessary Permits
You’ll likely need a building permit and possibly an electrical permit. The application process typically involves submitting your shed plans, site plan, and foundation details. Fees vary widely, from $100 to $500. Processing times can range from two weeks to two months, so factor this into your timeline.
3. Prepare the Site
Clear the area of vegetation, rocks, and debris. Mark the exact footprint of your office. For a stable foundation, you’ll need a level, compacted base. This might involve grading and adding a layer of crushed gravel for drainage.
Phase 3: Foundation & Framing – Building the Shell
A solid foundation is the most critical structural element. It prevents settling, moisture issues, and ensures your walls are plumb.
1. Choose Your Foundation Type
For a permanent office shed, a concrete slab is the gold standard. It provides a durable, level base and can be heated if desired. Alternatives include concrete pier blocks (less expensive, faster to install) or a gravel base (suitable for smaller, non-insulated sheds).
2. Frame the Floor
Construct a floor frame using 2×10 or 2×12 pressure-treated lumber. Install joists every 16 inches on center. Cover with 3/4-inch exterior-grade plywood or OSB. This creates a sturdy, level platform for your walls.
3. Erect the Walls
Build wall frames on the floor, then raise them into position. Use temporary braces to keep them plumb. Secure the walls to the floor frame with hurricane ties or concrete screws. Install window and door openings according to your plans.
4. Assemble the Roof
Construct roof trusses or rafters. A simple gable roof is ideal for shedding water and snow. Cover the frame with roof sheathing, then apply an underlayment and your chosen roofing material (asphalt shingles are common and cost-effective).
Phase 4: Utilities & Finishing – Making It a Functional Office
This phase transforms your shed from a shell into a comfortable, productive workspace. It’s where the real investment in quality pays off.
1. Electrical and Lighting
Running electricity to a detached structure requires a licensed electrician in most areas. You’ll need a dedicated circuit from your main panel, installed in a conduit underground or overhead. Plan for multiple outlets, USB charging stations, and dedicated circuits for your computer and any other high-draw devices.
Lighting is crucial. Combine overhead LED fixtures with task lighting at your desk. Consider smart bulbs that can be controlled remotely for ambiance and energy savings.
2. Insulation and Climate Control
Insulation is non-negotiable for a year-round office. Use R-13 fiberglass batts or spray foam in the walls, and R-19 or higher in the ceiling. Seal all gaps with spray foam to prevent drafts and moisture intrusion. For heating and cooling, a mini-split HVAC system is the most efficient and unobtrusive solution. It provides both heating and cooling without the need for ductwork.
3. Interior Finishes
Hang 1/2-inch drywall on the walls and ceiling for a clean, professional look. Paint with a light, neutral color to maximize the sense of space and reflect light. For the floor, consider luxury vinyl plank (LVP) for its durability, water resistance, and easy installation. It’s a significant upgrade over bare concrete or unfinished wood.
4. Exterior Details
Finish the exterior with siding, trim, and a durable paint or stain. Install a weather-resistant door with a solid-core interior for better sound insulation. Add window boxes or exterior lighting to enhance curb appeal and security.
Phase 5: Smart Integration & Ergonomics
For tech-enthusiasts, a backyard office is the perfect canvas for a smart, efficient workspace. This is where you can truly personalize your environment for maximum productivity.
1. Tech Infrastructure
Ensure robust internet connectivity. A wired Ethernet connection is more stable than Wi-Fi for video calls and large file transfers. Consider running a conduit from your main house to the shed for future fiber optic or additional wiring. Install a whole-shed smart home hub to control lighting, climate, and security from a single app.
2. Ergonomic Essentials
Invest in a high-quality, adjustable ergonomic chair and a sit-stand desk. Proper ergonomics prevent back and neck strain during long workdays. Position your desk to take advantage of natural light from the windows, but be mindful of glare on your screens.
3. Sound Management
Acoustic comfort is key. Use thick rugs, acoustic panels, or even bookshelves filled with books to dampen sound. A white noise machine can help mask external distractions. For video calls, consider a good quality microphone and a background that looks professional.
Cost, Timeline, and Value: The Bottom Line
Building a backyard office is a significant investment, but the return on investment can be substantial. Here’s a summary of what to expect:
| Factor | Details |
|---|---|
| Total Build Time (DIY) | 8-16 weeks, depending on experience and weather. |
| Total Build Time (Pro Builder) | 4-8 weeks, including permitting and inspections. |
| DIY Cost Range | $15,000 – $25,000 (materials, permits, tools). |
| Professional Build Cost Range | $25,000 – $40,000+ (includes labor and markup). |
| Resale Value Increase | Can add 5-15% to your home’s value, depending on quality and local market. |
| Primary Benefit | Dedicated workspace, improved productivity, work-life separation. |
For a detailed guide on energy-efficient building practices that can reduce long-term operating costs, refer to the U.S. Department of Energy’s Energy Saver guide.
Final Takeaways: Your Path to a Separate Workspace
Backyard office shed plans offer a powerful solution for homeowners seeking a dedicated, professional workspace. By following a structured, step-by-step blueprint, you can navigate the complexities of design, permits, construction, and finishing to create a space that enhances your productivity and well-being.
Key Takeaways:
- Plan Meticulously: Define your space, budget, and design before breaking ground. This prevents costly changes later.
- Respect Regulations: Always check local zoning laws and secure necessary permits. Compliance protects your investment.
- Invest in Quality: A solid foundation, proper insulation, and efficient HVAC are non-negotiable for a comfortable, year-round office.
- Embrace Technology: Integrate smart home features and robust internet for a seamless, modern workspace.
- Calculate True Costs: Budget for materials, permits, utilities, and potential professional help. The ROI in productivity and property value can be significant.
Frequently Asked Questions (FAQ)
Q: Can I build a backyard office shed myself?
A: Yes, if you have intermediate to advanced DIY skills. The framing, electrical, and plumbing aspects may require professional help, especially for permit inspections. A kit shed can simplify the process significantly.
Q: Do I need a permit for a detached office?
A: Most likely, yes. Permits are typically required for structures over 120 square feet, especially if they are connected to electricity or intended for year-round occupancy. Always check with your local building department.
Q: How much does it cost to build a 12×20 backyard office?
A: A DIY build for a 12×20 (240 sq ft) insulated office with basic finishes typically costs between $15,000 and $25,000. Professional builds can range from $25,000 to $40,000 or more, depending on materials and customization.
Q: What is the best foundation for a backyard office shed?
A: A poured concrete slab is the most durable and level foundation for a permanent office. It allows for radiant heating and provides a solid base for flooring. Concrete pier blocks are a good, less expensive alternative for smaller, non-insulated sheds.
Q: Can I use my backyard office as a rental property?
A: This depends entirely on local zoning laws and rental regulations. Some areas allow accessory dwelling units (ADUs) or short-term rentals, while others prohibit them. Consult your local planning department for specific rules.
Q: How do I keep my backyard office cool in the summer and warm in the winter?
A: Proper insulation (R-13 walls, R-19 ceiling) and a mini-split HVAC system are the most effective solutions. Additionally, consider energy-efficient windows, exterior shading (awnings, deciduous trees), and reflective roof coatings to manage temperature.
Q: What are the tax implications of a backyard office?
A: If the space is used exclusively for business, you may be able to deduct a portion of your home’s expenses, including utilities, insurance, and depreciation. Consult a tax professional for advice specific to your situation.
Ready to transform your backyard into a productive sanctuary? Start by sketching your ideal backyard office shed plans, researching local permits, and setting a realistic budget. Your future self, working in a dedicated, inspiring space, will thank you.