
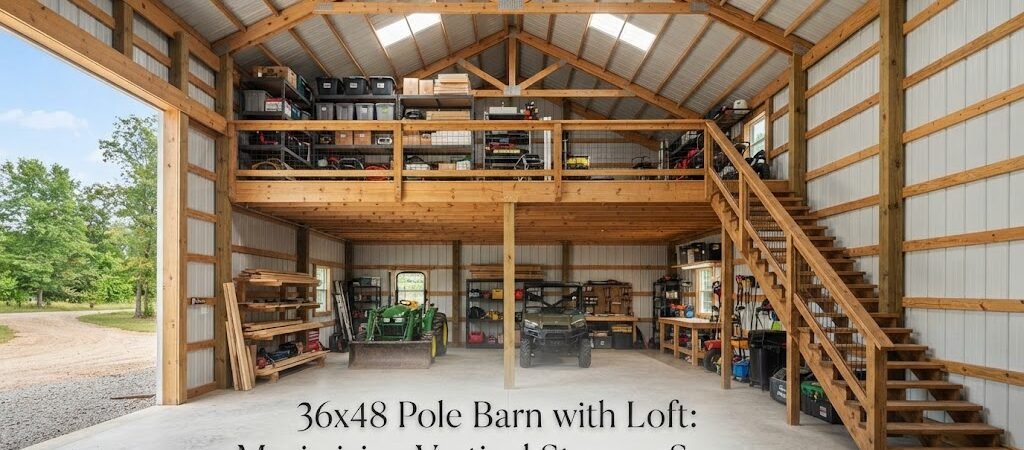
36×48 Pole Barn with Loft: Maximizing Vertical Storage Space
A 36×48 pole barn already gives you a solid footprint. At roughly 1,728 square feet on the ground floor, it’s big enough for equipment, vehicles, or a workshop. Adding a loft changes the equation. You gain storage up high without expanding the foundation or the roof footprint. That extra vertical space is useful when land is limited, budgets are tight, or you simply want to keep the ground level clear for daily work.
The loft turns unused air space into practical square footage. Hay, tools, seasonal gear, or extra materials can sit above while the main floor stays open for tractors, trucks, or a workbench. Done right, the loft feels like part of the building rather than an afterthought.
Why a Loft Makes Sense in This Size
A 36-foot width and 48-foot length give you room to work with. The width is wide enough for a center aisle or two rows of stalls or bays. The length lets you stretch the loft along one side or across a portion of the building. You don’t have to loft the entire area. Many people loft only half or two-thirds and leave the rest open to the rafters for taller equipment.
The height of the sidewalls matters more than the floor dimensions. Most pole barns for this purpose start at 12 or 14 feet on the sides. That gives enough clearance for a loft while still leaving usable headroom below. Go taller if you plan to store large machinery or want a more open feel.

Basic Layout Options
One common approach is a full-length loft along one long wall. The loft runs 48 feet and sits 10 to 12 feet deep. That keeps the opposite side open for vehicle access or large doors. Another option is a loft at one end that spans the full 36-foot width. This works well if you want the main floor free for a workshop or open storage.
Some builders create an L-shaped loft. Part of it runs along the side and then turns at the end. This can leave a larger open bay in the middle while still adding meaningful storage. The choice depends on how you plan to use the ground floor. Drive-through access, equipment height, and door locations should come first. The loft comes second.
If the building will also serve as a garage or shop, looking at garage and workshop blueprints can show how others balance floor space with overhead storage.
Getting Up and Down Safely
Access is one of the first practical questions. A fixed staircase takes up floor space but is safer and easier to use every day. Many people place the stairs along an end wall or against a sidewall so they don’t block the main work area. A simple straight run or a switchback works. Ladder access saves space but is less convenient for frequent trips or heavy items.
Whatever you choose, plan for it early. The opening in the loft floor needs to be large enough for safe passage and for moving materials up. Guardrails around the opening are standard practice. Some owners add a small platform or landing at the top so they can set things down before stepping fully onto the loft.
Floor Structure and Load Capacity
The loft floor has to support real weight. Light storage is one thing. Stacked hay, lumber, or heavy tools is another. Most lofts in pole barns use joists or trusses that sit on the posts or on ledger boards attached to the posts. The spacing and size of those joists depend on the span and the expected load.
Plywood or OSB is common for the deck. Some people use tongue-and-groove boards for a sturdier feel. If the loft will hold anything heavy, talk with the building supplier or an engineer about the design. Local conditions, snow load on the roof, and how the loft connects to the main frame all play a part. This is not the place to guess.
Clear Height Below and Above
Aim for at least 8 feet of clear height under the loft if people will work or walk there regularly. Ten feet is better if you park vehicles or run equipment. Above the loft, 6 to 7 feet of headroom is usually enough for storage. If you want to stand upright while organizing boxes or hay, plan for more.
The overall building height has to accommodate both levels plus the roof slope. A 14-foot sidewall with a moderate pitch often works well for a partial loft. Taller walls give more flexibility but cost more in materials and doors.
Doors, Windows, and Light
Large sliding or overhead doors on the ground floor remain the priority. The loft itself may need a small access door or hatch for loading from outside if you plan to lift materials with a tractor or hoist. Some people add a window or two in the loft area for natural light and ventilation. That helps if you ever use the space for more than pure storage.
Lighting below the loft can be tricky. The loft floor blocks some overhead light. Plan for wall-mounted lights or additional fixtures under the loft so the main floor doesn’t feel dark.
Materials That Work Well
The same post-frame system that holds the walls and roof can support a loft. Treated posts, metal roofing and siding, and standard framing lumber are typical. For the loft floor, focus on dry materials and good connections. Moisture can collect in enclosed spaces, so ventilation under the loft or along the eaves helps.
If the loft will hold hay or animal feed, consider dust and airflow. Open sides or screens on the loft area can reduce condensation and keep the space usable longer.
Planning the Whole Building
A loft changes how the rest of the building works. Door locations, post spacing, and truss design all need to account for it. Many suppliers offer packages that include a loft option. Comparing different pole barn plans shows how the loft can sit relative to the posts and how the roof structure adjusts.
Think about future use. A loft that starts as pure storage can later become a mezzanine for a small office or parts room if the structure and access are solid. Leaving a little extra strength in the design costs less than reinforcing later.
Cost Factors to Keep in Mind
Adding a loft increases material and labor. Extra framing, flooring, stairs or ladder, and any additional sheathing all add up. The exact amount depends on how large the loft is, the materials chosen, and local labor rates. In some cases the loft is the cheapest way to gain usable square footage because it doesn’t require more foundation or roof area.
Site conditions matter too. Flat, well-drained ground makes the whole project simpler. Poor soil or a slope may require extra work on the foundation regardless of the loft.

Practical Tips from Real Use
Keep the loft floor clear of clutter near the edge. Things fall. Store heavier items closer to the supporting posts or walls. Label boxes or use clear bins so you don’t have to climb up just to check what’s inside. If you use a ladder, store it in a fixed location so it’s always ready.
For farm or shop use, a small hoist or block and tackle over the loft opening can make loading easier. Some people leave a section of the loft open so a skid steer or tractor can lift pallets straight up.
Making the Most of the Vertical Space
The real advantage of a 36×48 with a loft is flexibility. You can keep the ground floor wide open for equipment and still have hundreds of square feet of dry storage above. That combination is hard to beat in a single structure. The loft doesn’t have to be finished or insulated unless you want it to be. Simple open framing and a solid floor are often enough.
When you start looking at options, reviewing actual pole barn plans with loft options helps you see real dimensions and layouts instead of guessing. Measuring your equipment, listing what you need to store, and sketching a few floor plans will tell you whether a partial loft or a larger one fits your needs best.
A well-planned loft turns a good-sized pole barn into a more efficient building. The ground stays free for the work you do every day, and the space above handles the rest. That’s the practical reason so many people choose this size and add the loft from the start.