
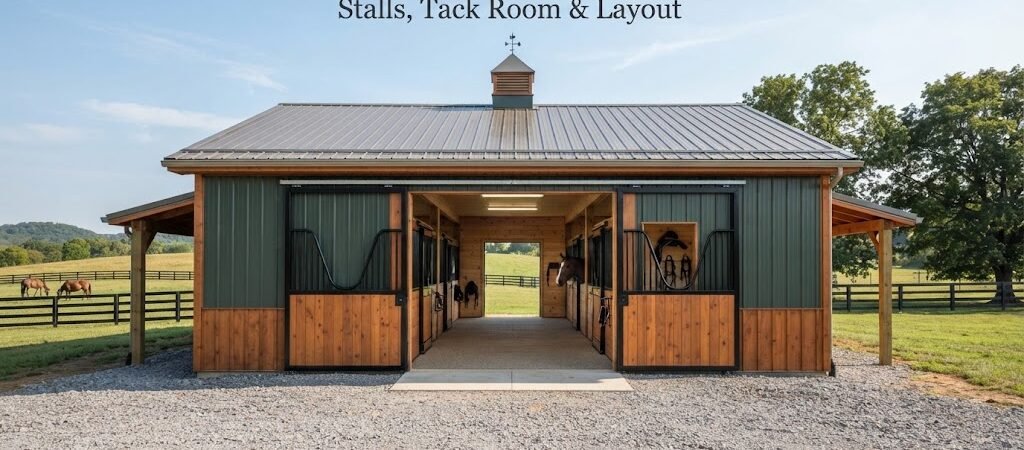
A 24×36 pole barn gives you 864 square feet to work with. That’s enough room for a solid small horse barn with stalls, a tack room, and space to move around comfortably. The trick is figuring out how to arrange everything so the building works well every day, not just on paper.
This size has become one of the most popular choices for folks with two to four horses. It fits most properties without dominating the yard, and the cost stays reasonable compared to larger setups. But squeezing in stalls, feed storage, and a place for your gear takes some thought.
What Fits Inside 24×36 Feet
Before getting into specific layouts, it helps to know what actually fits. A standard horse stall runs 12×12 feet minimum, though many people prefer 12×14 for larger breeds. Your center aisle should be at least 10 feet wide if you plan to turn horses around inside or bring equipment through. Twelve feet is better if you have the room.
A functional tack room needs about 8×10 or 10×10 feet depending on how much you store. Some people get by with 6×8, but it gets cramped fast once saddles, bridles, blankets, and cleaning supplies pile up.
Do the math on a typical setup and you’ll see why layout matters so much. Two 12×12 stalls take up 288 square feet. A 10×10 tack room eats another 100. A 10-foot aisle running the full 36-foot length uses 360 square feet. That’s 748 square feet already spoken for in an 864-square-foot building. You have some room left, but not a lot.
This is why looking at different pole barn plans early helps you see what others have done with similar spaces.

Common Layout Options
Two-Stall Layout With Large Tack Room
The simplest arrangement puts two stalls on one side, a generous tack room at one end, and an aisle running the length of the building. This leaves the other side open for storage or future expansion.
Most builders place the tack room at the back end, farthest from the main entrance. This keeps your expensive gear somewhat protected from weather and casual visitors. It also means the tack room wall helps block wind coming through the back of the barn.
The two stalls sit side by side along one long wall. Each stall gets its own door opening onto the center aisle. Some owners prefer stall fronts that can swing open fully, while others like Dutch doors that let horses poke their heads out.
This layout works best when your horses go out during the day and come in at night. Two stalls handle that routine easily. If you eventually want more stalls, the open side gives you room to add them later.
Three-Stall Layout With Compact Tack Room
Fitting three stalls into 24×36 means making some compromises. The stalls usually end up slightly smaller, or the aisle gets narrower, or the tack room shrinks.
One approach uses three 10×12 or 11×12 stalls. That squeezes them in while keeping each horse comfortable. Your aisle drops to maybe 9 or 10 feet. Still workable, but tighter when you’re leading a horse or moving wheelbarrows through.
The tack room might end up 8×8 or even 6×10. Enough room for basics, but you’ll need to stay organized. Wall-mounted saddle racks and bridle hooks become essential rather than optional.
Some people shift to a 10×12 foot tack room and accept a narrower 8-foot aisle. Whether that works depends on your situation. If you bring tractors or heavy equipment inside, eight feet feels pretty tight. If it’s just you and the horses, eight feet does the job.
Four-Stall Layout
Four honest-to-goodness stalls in 24×36 pushes things hard. Each stall ends up around 10×10 or slightly less, which meets minimum recommendations but doesn’t leave extra room. The aisle narrows considerably. The tack room becomes a tack closet.
This arrangement makes sense only for smaller horses or ponies, or for situations where horses spend minimal time stalled. Some competitive boarding operations use tight layouts like this because the horses are out working most days anyway.
If four full-size stalls matter to you, consider going wider than 24 feet. A 30×36 or 32×36 opens up significantly more options. Browsing building plan collections [insert link here] shows how a few extra feet change everything.
Aisle Placement And Flow
Where you put the aisle affects daily convenience more than most people expect before they build.
A center aisle gives you access to both sides. You can reach any stall or storage area without walking around the building. This matters when it’s raining, snowing, or dark. Center aisles also provide better ventilation when both sides have openings.
Side aisle layouts put the walkway along one wall with stalls or storage on the other side. This creates a longer, narrower path. It can work fine, but you lose the ability to open up both sides for cross-ventilation.
Think about how you actually move through a barn. You lead a horse from a stall to outside. You carry hay from storage to stalls. You push a wheelbarrow to the manure pile. You grab tack from the tack room and head back to groom a horse. A center aisle shortens most of those trips.
Door And Entrance Decisions
Your main entrance sets the tone for the whole layout. Most 24×36 barns use a sliding door at one gable end, typically 8, 10, or 12 feet wide. Wider doors accommodate tractors and equipment. Narrower doors cost less and seal up tighter in winter.
Place the main door so it opens onto your center aisle directly. Walking into a wall or a stall door feels wrong every single time you enter the building.
Many horse barns also include a rear exit door or dutch doors in each stall that open to a paddock or pasture. These don’t need to be full-size. A 4-foot door lets a horse walk through but keeps the opening small enough to close off easily.
Consider where winter winds come from before finalizing door placement. You don’t want your main entrance facing directly into prevailing storm winds if you can avoid it.
The Tack Room Details
A good tack room does more than store saddles. It becomes your workspace, your office, and sometimes your escape from weather or busy barn activity.
Start with the basics: saddle racks, bridle hooks, blanket bars, and shelving. Build or buy enough storage for what you actually own plus some growth room. Most people accumulate more gear than they expect.
Include a small counter or work surface. Even two feet of countertop lets you set down a bucket, mix supplements, or fill water bottles without crouching over a trunk.
Electrical outlets matter more than you might realize. Plan for lights, a small fridge if you store medications, a coffee maker because barn mornings start early, and outlets for clippers or other tools. One outlet is never enough. Put in four or six and thank yourself later.
Climate control is worth considering. Insulating the tack room separately from the main barn keeps temperature more stable. Saddles and leather last longer without extreme humidity swings. A small window air unit or space heater covers most needs unless you live somewhere brutally hot or cold.
Some owners add a small bench or chair. Sounds luxury until you’ve spent twenty minutes waiting for a farrier or vet and wished you could sit down.
Feed And Hay Storage
Where does the hay go? Where do you keep grain and supplements?
Options include a section of the tack room, a dedicated storage closet, or space along the back wall. Each choice trades off something.
Storing hay in the tack room risks dust settling on leather and clothes. Not ideal, but manageable with good containers and regular cleaning.
A separate feed room takes square footage away from stalls or aisle. Nice to have if you can spare the space.
Back-wall storage along the gable end works well in many layouts. Stack bales on pallets, keep grain in sealed bins, and everything stays accessible but out of the main flow.
Rodent control deserves attention wherever you store feed. Metal containers, tight-fitting lids, and minimizing hiding spots help. Once mice discover a reliable food source, they invite their extended family.
Ventilation Considerations
Horses breathe a lot of air. They produce moisture, dust, and ammonia from urine. Good ventilation keeps the air fresh and prevents respiratory problems.
Cupolas look traditional and help pull air up and out. Ridge vents along the roof peak work quietly and effectively. Louvered sidewall vents let crosswinds move through when weather permits.
Plan for ventilation you can adjust. You want plenty of airflow in summer but the ability to close things down when it’s bitterly cold and windy. Barns that breathe too well in January create drafts that chill wet horses.
Many builders recommend enclosing the upper portions of stall walls with mesh or grid panels. Air moves through while keeping horses safely contained. Solid walls below the grill height block drafty air at horse level where it bothers them most.
Flooring Choices
Dirt floors cost nothing and work okay for some situations. They get dusty in summer, muddy in wet seasons, and impossible to keep clean long-term. Digging out several inches and adding crushed stone or gravel improves drainage and firmness.
Concrete floors in aisles and tack rooms make cleaning simple. Sweep or hose off manure and spilled feed. Concrete holds up to hoof traffic and equipment wheels. It costs more upfront but saves labor forever after.
Stall flooring options range from dirt with mats to full rubber systems to clay and sand mixes designed specifically for horses. Each has fans and critics. The right choice depends on your climate, budget, and how much time horses spend stalled.
If you choose concrete anywhere, consider adding floor drains where code allows and where they make sense. Washing down an aisle is much easier when water drains away instead of pooling.
Roof Pitch And Overhangs
Standard pole barn roof pitches run from 4/12 to 6/12 for metal roofing. Steeper sheds snow faster in cold country. Shallower pitches use less material and cost slightly less.
Overhangs protect sidewalls and foundations from rain splash. Eighteen to twenty-four inch overhangs help considerably. They also shade windows and doors somewhat during summer heat.
Gable ends can have overhangs too, though some designs skip them to save money or match existing structures on the property.
Cost Factors To Expect
Nobody likes talking about money without real numbers, but prices vary wildly based on location, materials, labor markets, and how much work you do yourself. A 24×36 pole barn shell might run anywhere from twenty thousand to fifty thousand dollars finished out, with horse-specific interiors adding more on top of that.
Factors that push costs up include:
- Higher wind or snow load requirements in your area
- Upgraded siding or roofing materials
- Insulation throughout
- Concrete floors versus dirt or gravel
- Custom features like cupolas, wainscoting, or special doors
- Electrical rough-in and finishing
- Plumbing if you add wash racks or bathrooms
Getting multiple bids from local builders gives you actual numbers for your situation. Prices in rural Iowa differ from suburban Colorado or coastal Oregon.

Permitting And Setbacks
Most places require permits for a building this size. Agricultural exemptions exist in some areas, especially if the property qualifies as a farm for tax purposes. Never assume you’re exempt without checking.
Setback rules dictate how close to property lines you can build. These vary by jurisdiction and sometimes by structure type. A barn might have different requirements than a house or shed.
Utility locations matter too. Don’t build over septic fields, buried cables, or gas lines. Call before you dig, even on your own property.
Making Your Final Decision
The right layout matches how you actually live with your horses. Think through a typical day. Feeding, mucking, grooming, tacking up, bringing horses in and out. Picture each step and whether your planned arrangement helps or hinders.
If you board other people’s horses, client access and safety change what works best. If it’s just family horses, you can optimize for your own routines.
Draw your ideas on paper. Walk through the space mentally. Better yet, mark out 24×36 on the ground with stakes or spray paint and physically walk the layout. It reveals problems that look fine on paper.
When you’re ready to move forward, reviewing complete pole barn plans with detailed layouts can confirm your choices or show you something you hadn’t considered.
Getting Started With Your Build
A 24×36 horse barn sits in a sweet spot for many property owners. Big enough to be genuinely useful, small enough to stay affordable, flexible enough to adapt as your needs change.
Take time with the planning stage. A few extra hours thinking through layout details now prevents years of minor annoyances later. Talk to other horse owners about what works and what they’d change. Visit local barns if you can and pay attention to the details.
When you want to explore specific designs and see how others have arranged similar spaces, horse barn and workshop blueprints offer concrete examples to compare against your own ideas. Having a solid plan in hand before breaking ground keeps the project moving smoothly from start to finish.