
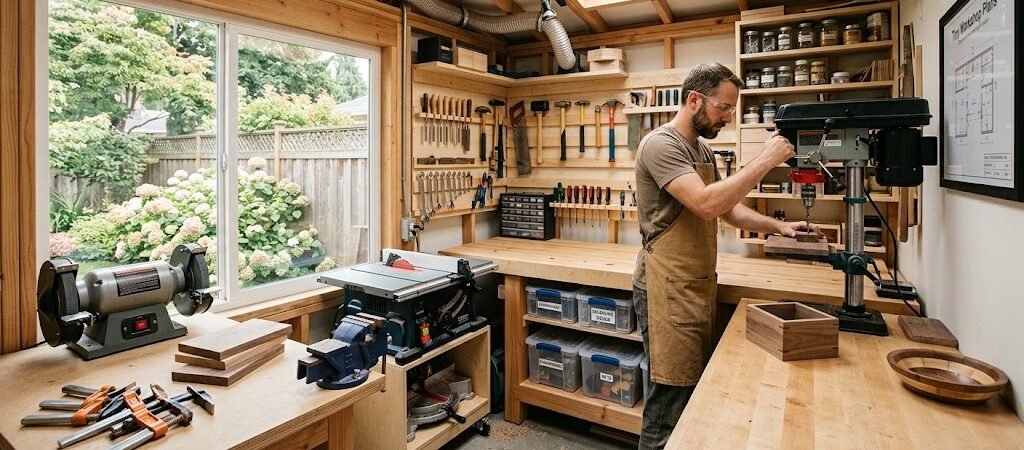
Tiny workshop plans transform compact buildings into fully functional small hobby shops. The best designs fit 8×10 to 12×16 feet, cost $3,000–$15,000, and support serious DIY work with proper layout and ventilation.
Why Choose Tiny Workshop Plans for Your Backyard?
You love building things, but your garage is already packed with cars, storage, and half-finished projects. A dedicated small hobby shop gives you the space to actually finish what you start. The trend toward compact workshop layout solutions has exploded because homeowners are realizing they don’t need a massive structure to pursue serious craftsmanship.
According to the National Association of Home Builders, over 68% of homeowners use their garage for storage rather than parking. That’s wasted square footage that could become a productive maker space. Tiny workshop plans address this by maximizing every inch of a modest footprint while keeping costs manageable.
How to Compare Tiny Workshop Building Types
Before diving into specific plans, understand which structure type fits your property, budget, and workflow. Each option has distinct advantages for a compact workshop layout.
| Building Type | Typical Size Range | Estimated Cost | Best For | Permit Difficulty |
|---|---|---|---|---|
| Tool Shed Workshop | 8×10 to 10×12 ft | $3,000–$6,000 | Light woodworking, tool storage | Low |
| Backyard Studio | 10×12 to 12×16 ft | $8,000–$15,000 | Mixed hobbies, power tools | Moderate |
| Converted Garage | 12×20 to 16×24 ft | $12,000–$25,000 | Full workshop, machinery | Moderate to High |
| Prefab Tiny Shop | 8×10 to 14×20 ft | $5,000–$12,000 | Quick setup, consistent quality | Low |
Your choice depends on three factors: available yard space, local zoning rules, and the scale of projects you want to tackle. A tool shed workshop handles hand tools and a bench grinder comfortably. If you plan to run a table saw or band saw, aim for at least 10×12 feet with 8-foot ceilings.
What Are Essential Layout Principles for Small Hobby Shops?
Compact workshop layout isn’t about cramming everything in, but rather creating efficient workflow zones through strategic placement. The golden rule: position your most-used tools within arm’s reach of your primary workbench.
- Work triangle: Place your workbench, storage wall, and entry point in a triangular flow pattern. This minimizes steps and optimizes material movement.
- Zoned storage: Group tools by project type instead of category. Keep all your joinery tools together, for instance.
- Overhead utilization: Install ceiling racks for bulky but infrequently used items like lumber or large project boxes.
- Clear pathways: Maintain at least 36-inch walkways between work zones to ensure smooth movement.
A tech-savvy maker I interviewed built a 10×12 tool shed workshop with a mobile workbench on casters that slides against the wall when he needs more floor space. This flexibility separates a cramped storage shed from a functional small hobby shop.
What Are the Power and Electrical Requirements?
Any serious tiny workshop plans must address electrical needs upfront. Most hobbyists underestimate how many circuits they actually require.
Minimum setup includes: one 20-amp circuit for general outlets, one 20-amp dedicated circuit for dust collection, and one 15-amp circuit for lighting. If you’re running a table saw or jointer, add another 20-amp circuit. Total electrical work typically runs $800–$2,000 depending on panel distance and local labor rates.
Don’t forget about internet connectivity. A backyard maker space benefits from smart tools, digital access, and video tutorials. Run Ethernet wiring during construction rather than relying on WiFi extenders.
How to Ensure Proper Ventilation and Air Quality?
Sawdust and fumes don’t respect square footage. Even in a tiny workshop, proper ventilation protects your health and keeps your workspace usable.
At minimum, install one exhaust fan rated for your space’s cubic footage. For a 10×12 room with 8-foot ceilings (960 cubic feet), a 200 CFM fan provides one air exchange every 4.8 minutes. Position the fan high on the wall opposite your work area to create cross-ventilation.
For finishing work involving solvents, add active ventilation with filtration. A $300–$600 carburetor air cleaner or box fan setup with MERV-13 filters pulls fumes away from your breathing zone.
What Lighting Strategies Should You Use?
Poor lighting can turn a compact workshop layout into a frustration factory. You’ll make mistakes, waste materials, and risk injury. LED shop lights are the standard for good reason: they’re efficient, bright, and affordable.
Plan for 5,000–7,000 lumens total in a 10×12 space. That’s roughly four 4-foot LED shop fixtures at 1,500 lumens each. Mount them perpendicular to your primary work direction to minimize shadows. Add task lighting with an adjustable arm lamp for detailed work.
Consider smart lighting controls. A $50–$100 smart switch or motion sensor lets you turn on lights automatically when entering the workshop.
What Are the Best Storage Solutions for Tiny Spaces?
Storage in a tiny workshop demands creativity. Every vertical inch counts, and floor space is premium real estate.
- Pegboard walls: Cover one full wall with pegboard for hand tool organization. A 4×8 sheet costs $25–$40 and holds dozens of tools visibly.
- Mobile tool carts: Keep frequently used tools on rolling carts that tuck under benches when not in use.
- Overhead lumber rack: Build or buy a ceiling-mounted rack for boards longer than your walls, clearing up floor space.
- Shadow boards: Outline each tool on pegboard to immediately see which tools are missing.
One maker space I visited used tension rods between cabinets to hang clamps vertically. Zero cost, maximum accessibility. These kinds of hacks come from treating every inch as intentional.
What Building Codes and Permit Considerations Are Necessary?
Most tiny workshop plans fall under accessory structure regulations. However, rules vary wildly by municipality. Some areas allow tool shed workshops up to 120 square feet without permits, while others require inspections for any structure over 200 square feet, regardless of use.
Before purchasing plans or breaking ground, check these requirements:
- Setback distances from property lines (typically 3–10 feet)
- Maximum structure height (often 10–12 feet)
- Foundation requirements (gravel pad vs. concrete slab)
- Electrical permit necessity
- Zoning restrictions on commercial use
Assuming you don’t know your local codes is a costly mistake. A $50 permit application fee can save you thousands in potential removal orders or fines.
DIY vs. Professional Build: What Are the Costs Involved?
Building your tiny workshop yourself versus hiring professionals results in dramatically different outcomes, both financially and in terms of time investment.
| Approach | Time Investment | Material Cost | Labor Cost | Total Estimate |
|---|---|---|---|---|
| DIY from scratch | 40–80 hours | $2,500–$5,000 | $0 | $2,500–$5,000 |
| DIY prefab kit | 20–40 hours | $4,000–$8,000 | $0 | $4,000–$8,000 |
| Professional build | 0 hours | $5,000–$10,000 | $5,000–$15,000 | $10,000–$25,000 |
DIY from scratch offers the lowest cost but demands significant skill and time. If you’ve never framed a wall, expect a steeper learning curve. Prefab kits strike a middle ground, allowing reduced errors while keeping costs reasonable. Professional builds deliver turnkey results but often at a premium that can double your total project cost.
How to Integrate Technology in Your Tiny Workshop?
Modern tiny workshop plans can incorporate smart features that enhance productivity and safety without breaking the budget.
Start with a smart plug system ($50–$100) to automate dust collector timing. Set it to run for 30 seconds after each tool shuts off to clear dust from the ductwork. An air quality sensor for about $30 alerts you when particulate levels exceed safe thresholds.
For tool tracking, consider a simple Bluetooth item finder system. Attach tags to expensive hand tools to locate them promptly when misplaced.
What Are Common Mistakes to Avoid When Planning Your Workshop?
Even experienced builders make these errors when planning a compact workshop layout:
- Undersizing the door: A 36-inch door works for people, but an 80-inch door lets you move 8-foot lumber through without disassembly.
- Ignoring future needs: Plan for one additional power tool you might buy. This means one extra outlet and circuit capacity.
- Sacrificing ceiling height: Seven-foot ceilings feel cramped. Aim for 8 feet minimum, and 9 feet if possible.
- Skipping insulation: An uninsulated tool shed workshop may become unusable in extreme temperatures. Basic fiberglass batts extend your working season significantly.
Where Can You Find Reliable Tiny Workshop Plans?
Quality plans can make the difference between a frustrating build and a smooth construction process. Look for resources that offer detailed cut lists, material specifications, and step-by-step illustrations.
Free plans online vary widely in quality. Paid plans from reputable architects or woodworking educators typically cost $30–$80 and include engineering details and material optimization. The investment pays for itself when you avoid costly errors during construction.
Always verify that plans match your local climate zone as a design optimized for dry climates may require modifications for humid or cold regions, particularly regarding ventilation and insulation.
How to Maximize Multi-Use Functionality?
The best tiny workshop plans consider activities beyond your primary hobby. A space that serves dual purposes justifies its footprint and cost.
Design your compact workshop layout to accommodate both workshop and storage functions. Install fold-down benches that convert to work surfaces when needed and tuck away when you want floor space for larger projects.
Consider seasonal projects and how they might change your needs. Your tiny workshop should adapt as your interests evolve.
Final Checklist Before You Build
Prior to committing to any tiny workshop plans, run through this verification list:
- Confirm local zoning allows accessory structures on your property
- Measure your available space with 2-foot clearance on all sides
- Calculate your electrical panel capacity for additional circuits
- Choose plans that include ventilation specifications for your climate
- Verify door dimensions accommodate your longest projects
- Budget 20% extra for unexpected costs and upgrades
- Schedule a pre-construction meeting with your building department
A well-planned tiny workshop delivers years of productive use. The key is starting with realistic expectations, thorough research, and plans that match your actual needs rather than aspirational ones.
Frequently Asked Questions
How small can a functional workshop be?
A 8×10 foot tool shed workshop can handle light woodworking, hand tool restoration, and small project assembly. Mobile storage and wall-mounted organization will help maximize the footprint.
Do I need a permit for a tiny workshop?
Most jurisdictions require permits for structures over 200 square feet. However, some areas exempt sheds under 120 square feet. Always check with your local building department beforehand.
Can I use a prefab shed as a workshop?
Yes, prefab sheds can serve as the shell for a compact workshop. However, you’ll need to modify the interior to add flooring, electrical, ventilation, and workbenches.
What’s the minimum ceiling height for a workshop?
Eight feet is the practical minimum for comfortable work; anything less may feel cramped and limit storage options.
How much does it cost to convert a shed into a workshop?
Converting a basic 10×12 shed into a small hobby shop typically costs $2,000–$5,000 for necessary modifications like flooring, electrical, and ventilation.