
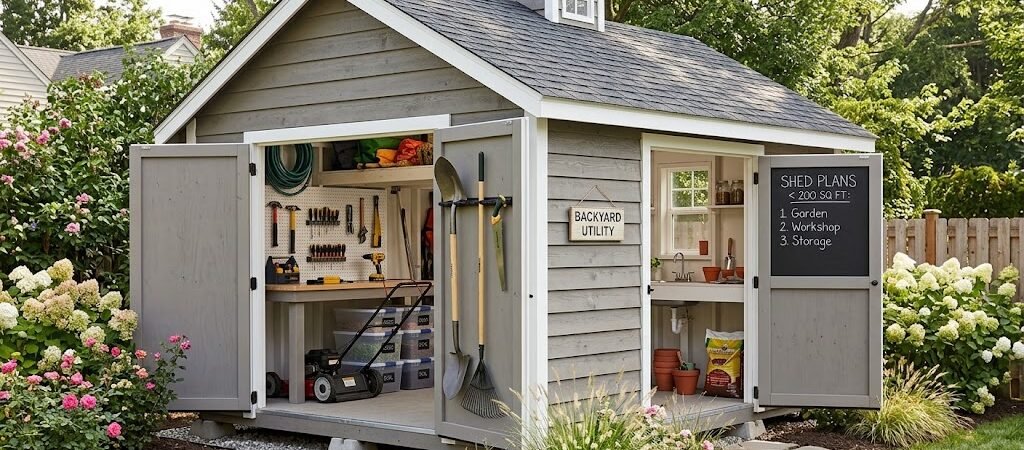
Shed plans under 200 sq ft provide a practical solution for backyard storage, workshops, or hobby spaces without requiring extensive permits or massive budgets. These compact designs typically cost between $2,000 and $5,000 to build, depending on materials and finishes, and can be completed in a weekend to a few weeks with basic carpentry skills.
The Problem with Overbuilding: Why 200 Square Feet Is the Sweet Spot
Most homeowners start with a vision that quickly spirals into a 400-square-foot garage conversion. You order lumber, pour a concrete slab, and realize you’ve spent $8,000 on a space you’ll use three days a year.
The reality is that backyard storage under 200 sq ft hits the perfect balance. It’s large enough to house a workbench, tool storage, and seasonal equipment. It’s small enough to often skip building permits in many municipalities. And it’s compact enough to fit in a corner without dominating your yard.
For tech enthusiasts, this size represents something familiar: efficient design. Like a well-optimized circuit board, every inch serves a purpose. No wasted space. No unnecessary components. Just functional, purposeful construction.
Three Compact Shed Designs That Actually Work
Before you cut a single piece of lumber, you need to choose a design that matches your actual needs. Most people overestimate what they’ll store. A careful audit prevents costly mistakes.
Design 1: The 10×10 Utility Shed (100 Sq Ft)
This is the most popular small outbuilding plans configuration. A 10-by-10 foot footprint gives you 100 square feet of floor space with 8-foot walls. The interior fits a 4×8 workbench along one wall, overhead storage racks, and a tall cabinet for tools.
The footprint leaves plenty of yard space. You can place it against a fence, in a corner, or even on a slight slope. Foundation options range from gravel pads to concrete pavers, keeping costs between $800 and $1,500 for materials alone.
Design 2: The 12×12 Workshop (144 Sq Ft)
When you need room for a table saw or a project bench, the 12×12 design delivers 144 square feet. This size accommodates a central work island with storage underneath, wall-mounted tool panels, and still leaves walking space around the perimeter.
The extra 44 square feet over the 10×10 version makes a real difference. You can fit a small refrigerator for breaks, a parts washer, or a standing desk area. Material costs typically run $2,500 to $3,500 depending on finish quality.
Design 3: The 8×16 Lean-To (128 Sq Ft)
Not every shed needs four freestanding walls. A lean-to design attaches to your house or a sturdy fence, using one existing structure as a wall. This reduces material needs by 25 to 30 percent while still providing 128 square feet of usable space.
The roof drains toward the house, which simplifies water management. You’ll need to flash the connection properly to prevent leaks. This design works especially well for tiny workshop setups where you want to run electricity from the house without trenching.
Step-by-Step: Building Your Compact Shed From Foundation to Finish
Each phase of construction builds on the previous one. Skip details now, and you’ll pay for them later with sagging doors, uneven floors, or water intrusion.
Phase 1: Site Preparation and Foundation (Days 1-2)
Start by clearing the site of vegetation, rocks, and debris. Mark the shed footprint with stakes and string. Check local zoning requirements for setback distances—most areas require 5 to 10 feet from property lines.
For compact shed design under 200 sq ft, you have three foundation options:
- Gravel pad: Dig 6 inches deep, lay landscape fabric, add 4 inches of compacted gravel. Cost: $200 to $400. Best for lightweight structures and poor drainage areas.
- Concrete pavers: Place 4×4 or 6×6 pavers on level gravel. Cost: $300 to $600. Provides a stable, level surface without permanent commitment.
- Poured concrete slab: Pour a 4-inch slab with rebar reinforcement. Cost: $800 to $1,500. Most durable option but requires curing time and permits in many areas.
Phase 2: Floor Framing and Sheathing (Days 3-4)
Build the floor frame using 2×6 or 2×8 lumber spaced 16 inches on center. For a 10×10 shed, this means three joists running the 10-foot length. Secure the frame to your foundation with concrete anchors or gravel stakes.
Sheathe the floor with 3/4-inch exterior-grade plywood. This creates a solid base for walls and prevents sagging. Add a rim joist around the perimeter for additional stiffness and a nailing surface for siding.
Phase 3: Wall Construction and Erection (Days 5-7)
Frame walls on the floor using 2x4s at 16-inch spacing. Cut openings for doors and windows before raising walls. For a 10×10 shed with an 8-foot ceiling, wall plates sit at 8 feet tall.
Raise walls in sequence. Brace them temporarily with 2x4s nailed to the floor and leaning against the wall. Plumb each wall before permanent attachment. Use a level and check diagonals to ensure the frame is square.
Phase 4: Roof Framing and Sheathing (Days 8-10)
Choose a roof style that matches your design. Gable roofs shed water efficiently and allow for ventilation. Shed roofs (single slope) are simpler to build and work well for lean-tos.
For a gable roof on a 10×10 shed, cut rafters at the appropriate pitch—typically 4/12 to 6/12 for residential sheds. Install a ridge board, then nail rafters to the top plates and ridge. Add trusses every 24 inches for spans over 10 feet.
Sheathe the roof with 1/2-inch plywood or OSB. This creates the base for your roofing material and provides nailing surface for gutters if needed.
Phase 5: Roofing and Weather Protection (Days 11-12)
Apply roofing felt or synthetic underlayment starting at the eave. Overlap layers by 2 inches and secure with cap nails. Install asphalt shingles according to manufacturer specifications, starting from the bottom corner.
Flash all penetrations and edges. Use metal flashing at the ridge, valleys, and where the roof meets walls. This step prevents the most common shed failures: water intrusion and rot.
Phase 6: Siding and Trim (Days 13-15)
Install siding starting at the bottom corner. Overlap horizontal siding by 1 inch and secure with corrosion-resistant nails. Cut openings for doors and windows with a circular saw and finishing saw.
Add trim around openings and corners. This isn’t just aesthetic—trim seals gaps and directs water away from vulnerable joints. Use primed MDF or cedar trim for durability.
Phase 7: Doors, Windows, and Finishing (Days 16-18)
Hang doors on heavy-duty hinges with screw eyes and latch mechanisms. Adjust hinges until doors close smoothly without binding. Install weatherstripping around the door frame to keep out drafts and pests.
Add windows for natural light and ventilation. Even a single 2×2 foot window makes a huge difference in usability. Finish with exterior paint or stain to protect the wood and match your home’s aesthetic.
Material Cost Breakdown for a 12×12 Shed
Understanding costs upfront prevents budget surprises. The following table breaks down material expenses for a 12×12 shed with basic finishes.
| Component | Estimated Cost | Notes |
|---|---|---|
| Foundation (gravel pad) | $300 – $500 | Includes gravel, fabric, and labor |
| Lumber (framing, floor, roof) | $900 – $1,200 | Pine or spruce, pressure-treated for ground contact |
| Plywood (floor, roof, walls) | $400 – $600 | 3/4-inch exterior grade for floor, 1/2-inch for roof |
| Roofing materials | $250 – $400 | Asphalt shingles, underlayment, flashing |
| Siding and trim | $300 – $500 | LP SmartSide or cedar shake |
| Doors and windows | $400 – $800 | Pre-hung door, one 2×2 window |
| Fasteners and hardware | $150 – $250 | Nails, screws, hinges, latch |
| Paint or stain | $100 – $200 | Exterior grade, two coats |
| Total | $2,800 – $4,450 | Excludes tools and permit fees |
These costs assume you’re doing the work yourself. Hiring a contractor typically doubles the price due to labor charges. For a tiny workshop with electrical and lighting, add $500 to $1,000 for wiring, outlets, and fixtures.
Permit Considerations: When You Need Approval and When You Don’t
Building codes vary by municipality, but most areas exempt sheds under 200 square feet from permits if they’re detached and not connected to utilities. Always verify with your local building department before starting.
Common permit triggers include:
- Structural size exceeding 120 to 200 square feet (varies by location)
- Permanent foundations like poured concrete
- Electrical or plumbing installations
- Placement within flood zones or near property lines
Skipping required permits can result in fines, forced removal, or problems when selling your home. A quick phone call to your local building department takes 10 minutes and prevents thousands in potential complications.
Tech-Enthusiast Upgrades for Your Compact Shed
For those who appreciate efficient systems, these upgrades transform a basic shed into a functional workspace.
Smart Climate Control
Install a mini-split HVAC system or portable heater with a thermostat. Temperature control prevents tool rust and keeps epoxy adhesives from failing in winter. A $400 to $800 mini-split handles 150 square feet efficiently.
LED Lighting and Outlets
Run a dedicated 20-amp circuit from your main panel. Install LED panel lights and GFCI-protected outlets. Smart switches allow voice control and scheduling. Budget $300 to $600 for basic electrical work if you’re comfortable with wiring.
Organizational Systems
French cleat wall systems, pegboard panels, and magnetic tool strips maximize vertical storage. A $200 to $400 investment in organization keeps your workspace efficient and your tools accessible.
Common Mistakes to Avoid in Small Shed Construction
Even experienced builders make these errors when constructing compact sheds:
Undersizing the door: A 30-inch door works for tools but not for wheelbarrows or equipment. Go with at least 36 inches wide and 80 inches tall for versatility.
Skipping ventilation: Stagnant air causes condensation and mold. Install soffit vents, ridge vents, or passive wall vents. Even two 4×8 inch louvers improve airflow significantly.
Using interior-grade plywood outdoors: Interior plywood delaminates when exposed to moisture. Always use exterior-grade or pressure-treated lumber for outdoor construction.
Neglecting site drainage: Water pooling around your shed accelerates rot. Grade the site to slope away from the structure and consider French drains in wet climates.
Final Checklist: Is Your Shed Plan Ready to Build?
Before purchasing materials, verify these items to ensure a smooth construction process:
- ✓ Local zoning and permit requirements confirmed
- ✓ Site cleared and marked with accurate dimensions
- ✓ Foundation type selected and materials sourced
- ✓ Framing plans include door and window openings
- ✓ Roof pitch chosen for your climate and aesthetic
- ✓ Materials list calculated with 10 percent waste allowance
- ✓ Tools available or rented for the project scope
- ✓ Weather forecast checked for continuous work windows
- ✓ Help arranged for lifting walls and roof sections
- ✓ Finishing materials (paint, stain, sealant) selected
Building shed plans under 200 sq ft doesn’t require professional carpentry skills. It requires careful planning, quality materials, and attention to detail at each phase. Start with a design that matches your actual needs, not your aspirational ones. Measure twice, cut once, and verify every step before moving forward.
The most successful compact sheds share one trait: they solve a specific problem efficiently. Whether that’s tool storage, a workshop, or a hobby space, define your primary use before breaking ground. Then follow the steps, respect the materials, and build something that serves you for decades.
Frequently Asked Questions
Do I need a permit for a shed under 200 square feet?
Most municipalities exempt detached sheds under 200 square feet from building permits, but requirements vary by location. Always check with your local building department before starting construction. Some areas require permits for any permanent structure, regardless of size.
How long does it take to build a 12×12 shed?
A skilled DIYer can build a 12×12 shed in 2 to 3 weekends with basic tools. A beginner might take 4 to 6 weekends working evenings and weekends. The timeline depends on experience level, weather conditions, and material availability.
What’s the cheapest way to build a small shed?
The most cost-effective approach uses a gravel foundation, pressure-treated pine framing, LP SmartSide or T1-11 siding, and asphalt shingles. Avoid concrete slabs, cedar siding, and complex roof designs to keep costs under $3,000 for materials.
Can I add electricity to my shed later?
Yes, but it’s easier and cheaper to rough in wiring during construction. Run conduit or Romex through wall studs before closing with siding. Add a sub-panel or dedicated circuit from your main panel. DIY electrical work must comply with local codes and often requires inspection.
What size shed is best for a tiny workshop?
A 10×12 shed (120 square feet) provides adequate space for a workbench, tool storage, and movement. A 12×12 (144 square feet) offers more flexibility for larger projects and equipment. Avoid going smaller than 8×10 if you plan to use power tools.