
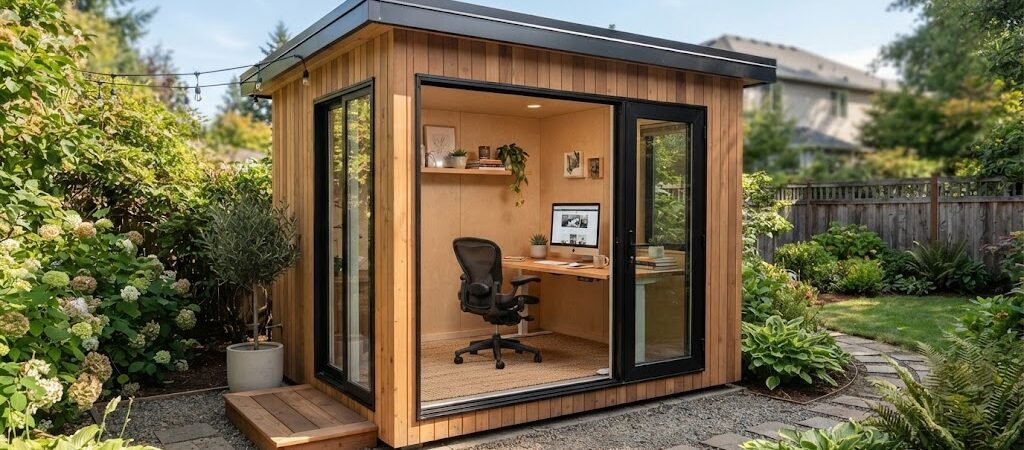
8×12 Backyard Office Plans: A Compact Work-From-Home Layout
An 8×12 backyard office gives you just enough space to work without eating up your entire yard. It’s 96 square feet, which sounds small on paper, but it’s actually a good size for a single-person workspace. You can fit a desk, some shelving, maybe a small seating area, and still move around comfortably.
A lot of people are putting these up now because working from home is sticking around, and trying to squeeze an office into the house doesn’t always work. Kids, noise, laundry, the kitchen—all of it can make focusing tough. A separate structure fixes that problem without requiring a massive build or a year-long permit process.
The 8×12 footprint is popular because it’s compact enough to fit in most side yards or back corners, but it’s roomy enough to feel like an actual office instead of a glorified shed. You can usually build one in a weekend or two if you’re handy, or hire someone to knock it out in a few days.

Why 8×12 Works Well for a Home Office
The dimensions break down into an 8-foot width and 12-foot length. That 12-foot run gives you wall space for a proper desk setup along one side without feeling cramped. The 8-foot width means you can add a chair, a small bookshelf, or even a narrow table across from your desk.
You’re not going to host meetings with five people in here, but that’s not really the point. This is a focused workspace. One person, one computer, maybe a phone and some files. It’s enough to get real work done without distractions.
Most building codes treat structures under 100 or 120 square feet differently than larger buildings. That often means simpler permitting, though rules vary by location. Some areas let you build without a permit if you stay under a certain size and don’t add plumbing or a permanent foundation. Others still want you to submit plans. Check with your local building department before you start cutting wood.
The 8×12 size also keeps material costs manageable. You’re working with standard lumber lengths, and you won’t need massive amounts of siding, roofing, or insulation. It’s easier to estimate what you need and harder to blow the budget.
Layout Options for an 8×12 Office
Inside an 8×12 space, layout matters. You don’t have room to waste, so think through where everything goes before you build.
Most people put the door on one of the 8-foot walls. That keeps the 12-foot walls open for your desk and storage. If you enter on the narrow end, you walk straight into the space and can set up your desk along the left or right wall. That gives you a long uninterrupted work surface.
Some folks prefer the door on one of the long walls, closer to one corner. That frees up the back wall for a desk that spans the entire 8-foot width. You can face the wall or position your desk so you’re looking out a window. Either way works, depending on whether you like the view or need to avoid glare on your screen.
Windows make a big difference in how the space feels. Two windows, one on each long wall, give you cross ventilation and natural light from both sides. If you’re working all day in there, good light keeps you from feeling like you’re in a cave.
You can also add a small window in the door or a skylight if your roof design allows it. Just don’t go overboard. Too many windows can limit your wall space for shelves or a whiteboard.
Electrical outlets should go where you’ll actually use them. Plan for at least two or three along the walls near your desk. If you’re running a computer, monitor, printer, phone charger, and a lamp, those outlets fill up fast. Running power to the building usually means trenching a line from your house or tapping into an existing outdoor circuit, so factor that into your plan early.
Some people add a small split unit for heating and cooling. Others use a space heater in winter and a fan in summer. Insulation helps either way. If you’re working year-round, insulated walls and a decent roof will keep the temperature comfortable without running up your power bill.
Foundation and Framing for an 8×12 Office
You don’t need a concrete slab for an 8×12 office, though you can pour one if you want. A lot of these structures sit on skids, concrete blocks, or a gravel pad with a wooden floor frame. Skids let you move the building later if you need to, and they’re faster to set up than a poured foundation.
If your yard is level, you can use treated 4×6 skids and build the floor frame on top. If the ground slopes, you might need to level it out first or use adjustable pier blocks. Either way, make sure the base is level before you start framing. A crooked floor makes everything harder.
The floor frame usually consists of 2×6 joists on 16-inch centers, with 3/4-inch plywood or OSB sheathing on top. That gives you a solid surface that won’t bounce when you walk across it.
Wall framing is straightforward. Most people use 2×4 studs on 16-inch centers for the walls. The 8-foot walls are short enough that you can frame them on the ground and tilt them up into place. The 12-foot walls are a bit longer but still manageable with a helper.
You’ll want a header over the door opening and any windows. The size of the header depends on the span, but for a standard 36-inch door, a double 2×6 or 2×8 header usually does the job. For windows, the same approach works.
Roof framing depends on the style you choose. A simple gable roof with a 4/12 or 5/12 pitch is easy to build and sheds water well. You can frame it with 2×4 or 2×6 rafters, depending on your snow load and how much overhang you want. A shed roof is even simpler—just one sloped plane. It looks clean and modern, and it’s fast to frame.
Sheathing goes over the rafters, then felt paper or synthetic underlayment, then shingles. Metal roofing is another option. It lasts longer and handles weather well, though it costs a bit more up front.
Insulation and Interior Finish
If you’re using the office year-round, insulation makes a big difference. Fiberglass batts between the studs work fine. R-13 in the walls and R-19 or R-30 in the ceiling keeps the space comfortable without overdoing it.
You can finish the interior with drywall, plywood, or tongue-and-groove boards. Drywall gives you a clean look and is easy to paint. Plywood or shiplap adds texture and a bit of character. Both work. Pick what fits your style and skill level.
Flooring can be as simple as painted plywood or as finished as vinyl plank or laminate. If you insulated the floor, a layer of foam board under the plywood helps with cold feet in winter. A small area rug adds comfort and cuts down on echo if the walls are hard surfaces.
Trim around the door and windows cleans up the edges and hides any gaps. Baseboard along the floor does the same. You don’t need anything fancy—just enough to make it look intentional.
What an 8×12 Office Can’t Do
An 8×12 office is great for focused solo work, but it’s not a conference room. You’re not holding team meetings in here unless everyone’s okay standing or sitting on the floor.
Storage is limited. You can add a few shelves or a small filing cabinet, but this isn’t the place to stash boxes of old files or extra equipment. If you need serious storage, consider adding a small shed nearby or using part of your garage.
Plumbing is possible but adds cost and complexity. If you want a sink or a small bathroom, you’ll need to run water and sewer lines, which means permits and probably a contractor. Most people skip plumbing in an 8×12 office and just walk back to the house when needed.
You also won’t have a lot of extra space for guests. If you occasionally need to meet with a client or coworker, you can fit a second chair, but it’ll be cozy. For regular meetings, you’re better off using your house or meeting somewhere else.
Cost and Time to Build
Material costs for an 8×12 office usually run somewhere between $3,000 and $8,000, depending on what you choose for siding, roofing, windows, and interior finish. That’s just materials. If you hire out the work, labor can double or triple that number, depending on your area and how finished you want the interior.
If you’re building it yourself and you’ve done some framing before, you can finish the structure in a couple of weekends. Electrical work might take another day or two, and finishing the interior adds more time depending on how detailed you get.
Buying a prefab kit or a pre-built shed can speed things up, but you’ll pay more for the convenience. Some companies sell 8×12 office kits with pre-cut lumber and step-by-step instructions. Others deliver a finished building and drop it on your property. Both options work if you don’t want to deal with the construction yourself.
Choosing or Modifying Plans
If you’re starting from scratch, comparing pool house and cabana plans can give you useful layout ideas even if you’re building an office instead of a pool structure. Many of those plans are designed for small footprints and efficient use of space, which translates well to a backyard office.
Look for plans that show clear framing details, window placement, and door swings. A good set of plans will include a materials list, so you know what to buy before you start. Some plans also show electrical layouts, which helps if you’re not sure where to run outlets or lights.
You can also modify plans to fit your needs. If a plan shows a window where you’d rather have a wall, or a door on the opposite side, most changes like that are easy to make. Just keep the basic framing structure intact and adjust the details.
If you’re thinking about adding a bit more space down the line, looking through a cabin plans collection might inspire some ideas for layouts that can grow or adapt. Some small cabin designs include built-in desks, lofted storage, or clever furniture arrangements that work just as well in a backyard office.
Setting Up the Inside
Once the building is up, setting up the interior is where it starts to feel like a real office. Start with the desk. Measure the wall space and pick something that fits without crowding the room. An L-shaped desk can work in the corner if you want more surface area. A simple rectangular desk along one wall keeps things open.
Add a comfortable chair. You’re going to spend hours in it, so don’t cheap out. A decent office chair with adjustable height and lumbar support makes a difference.
Lighting matters too. Overhead lights work, but adding a desk lamp gives you better task lighting and reduces eye strain. If you’re on video calls, a ring light or softbox helps you look less like you’re calling from a cave.
Keep the decor simple. A plant, a couple of framed prints, maybe a bulletin board. The goal is to make it feel like a space you want to work in without cluttering it up. You don’t have room for a lot of stuff, so make what you add count.
Finishing Touches and Long-Term Use
After you’ve been using the office for a while, you’ll figure out what’s missing. Maybe you need a better heater, or more outlets, or a shelf you didn’t think you’d need. That’s normal. Small tweaks over time make the space work better.
Check the roof and siding once a year. Look for loose shingles, gaps around windows, or anywhere water might sneak in. Catching small problems early keeps them from turning into big ones.
If you’re in a cold climate, make sure the door seals well. A cheap door sweep or some weatherstripping goes a long way toward keeping heat in and drafts out.
The 8×12 size is flexible enough that if your work needs change, the building can too. It can become a studio, a craft room, a guest space, or even a pool house if you add one later. That versatility makes it a solid investment even if your current job situation shifts.
If you’re ready to move forward, looking through a pool house and cabana plans collection can help you compare layout options and see what works best for your yard and workflow. A little planning up front makes the build smoother and the finished space more useful.