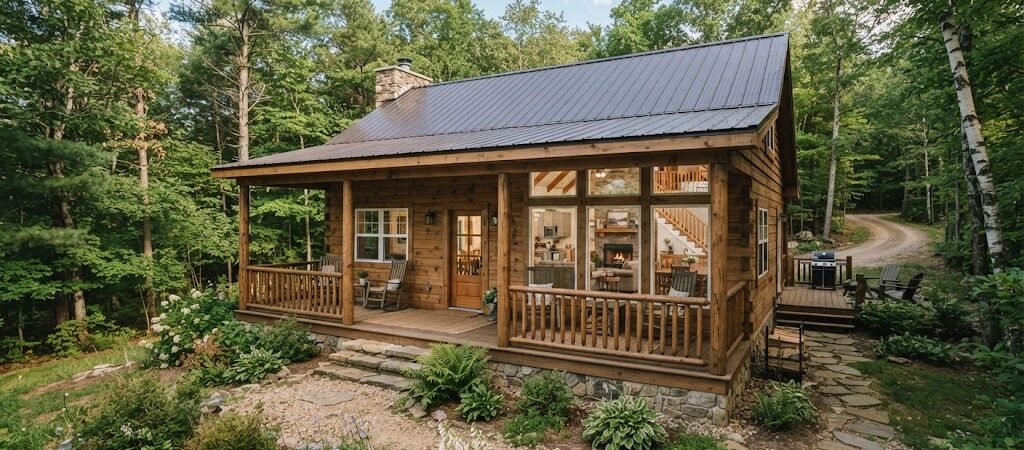
24×36 cabin plans deliver 864 square feet of usable space—enough for a comfortable full-time small cabin, a spacious vacation home layout, or a serious mountain retreat plan. At this size, you get room for two bedrooms, a full kitchen, and a proper living area without the expense of a larger build.
“`
Why Are 24×36 Cabin Plans Ideal for Builders?
Most cabin builders hit a wall around 800 to 900 square feet. Smaller than that, and you’re folding a toilet into the kitchen. Bigger, and your budget and foundation costs spiral fast. The 24×36 footprint sits right in the Goldilocks zone.
You get a full 864 square feet on a single story. That means you can plan a real master bedroom, a second bedroom or office, a proper bathroom, and a kitchen that doesn’t feel like a galley. The 24-foot width also gives you flexibility for a garage or workshop bay on one end if you need it.
Foundation costs for this size typically run between $8,000 and $15,000 depending on whether you choose a pier and beam, slab, or crawl space. Permits in most rural counties for an 864-square-foot structure fall in the $500 to $2,000 range, but you should always verify with your local building department before committing.
What Are the Best 24×36 Floor Plan Layouts?
Not every 24×36 cabin plan looks the same. The layout you choose shapes how the space feels day to day. Here are three approaches that actually work in practice.
Layout A: The Two-Bedroom Full-Time Cabin
This is the most popular configuration for people who want to live in the cabin year-round. The floor plan splits the 864 square feet into a 14×14 master bedroom, a 12×12 second bedroom, a 5×8 full bathroom, a 10×12 kitchen, and an open 16×18 living and dining area.
The trick here is placement. Put the master bedroom on one side of the cabin and the second bedroom on the other. That gives you privacy if you have guests or a partner who works from home. The bathroom sits between them as a shared hub.
Kitchen placement matters more than you might think. Position it near the entrance so you aren’t cooking with traffic flowing through your space. A 10×12 kitchen with a 6-foot counter run and a small island works comfortably in this layout.
Layout B: The Vacation Home Layout with Loft
If you’re building a mountain retreat plan for weekend getaways, a loft bedroom opens up lots of possibilities. You can drop the second bedroom into a loft above the living area and free up the main floor for a larger kitchen and living space.
The main floor in this version might feature a 16×20 great room, an 11×12 kitchen, and a 6×8 bathroom. The loft adds roughly 200 to 250 square feet of sleeping space, bringing total usable area to around 1,050 to 1,100 square feet.
Loft bedrooms work best when the ceiling height in the main living area is at least 10 feet. That gives you enough headroom below and enough floor space above without making the loft feel cramped. A standard 7-foot loft floor with a steep ladder or compact staircase is comfortable for most adults.
Layout C: The Open-Concept Mountain Retreat Plan
Sometimes you don’t need separate bedrooms at all. An open-concept 24×36 cabin plan maximizes the sense of space and works beautifully as a vacation home layout where the cabin serves as a secondary residence.
This layout typically features a 14×16 living area that flows directly into a 12×14 kitchen with a large island. One bedroom and one bathroom sit in a private wing, leaving the rest of the cabin as a single open gathering space. The kitchen island becomes the natural divider between cooking and lounging zones.
This approach is especially popular for smaller lots where you want the cabin to feel expansive from the outside. Large windows on the long 36-foot wall can make the interior feel twice as big.
What Does It Cost to Build a 24×36 Cabin?
Cost is where theory meets reality. Here’s a realistic look at what you’re working with for an 864-square-foot cabin built to a decent standard.
| Component |
Low End |
Mid Range |
High End |
| Foundation |
$8,000 |
$12,000 |
$18,000 |
| Framing & Shell |
$35,000 |
$52,000 |
$72,000 |
| Roofing |
$6,000 |
$9,500 |
$14,000 |
| Windows & Doors |
$4,500 |
$7,500 |
$12,000 |
| Plumbing |
$5,000 |
$8,500 |
$13,000 |
| HVAC |
$3,500 |
$6,000 |
$10,000 |
| Electrical |
$4,000 |
$6,500 |
$9,500 |
| Interior Finishes |
$12,000 |
$20,000 |
$32,000 |
| Exterior Finishes |
$6,000 |
$10,000 |
$16,000 |
| Permits & Fees |
$500 |
$1,500 |
$3,000 |
| Total Estimated Cost |
$84,500 |
$134,500 |
$197,500 |
These numbers assume you’re doing most of the work yourself or hiring a small local crew. A turnkey build from a custom cabin company will run 30 to 50 percent higher. Material costs also vary significantly by region—lumber in the Pacific Northwest can be double what you pay in the Southeast.
One thing most cost estimates miss: utility hookups. If your build site is off-grid or requires extending power, water, or septic, add $5,000 to $25,000 depending on distance and terrain. A standard septic system run costs between $3,000 and $8,000 installed.
What You Need to Know About Full-Time Living in a Small Cabin
Living full-time in a smaller cabin floor plan is very different from visiting one. The margins for error shrink when you’re cooking, cleaning, and sleeping in the same 864 square feet every single day.
Storage becomes your biggest design challenge. Plan for at least 40 linear feet of closet space across all rooms. That means deep reach-in closets in both bedrooms, a pantry in the kitchen, and built-in storage under stairs or along hallways. A 24×36 cabin with poor storage feels cramped fast.
Kitchen design deserves extra attention. A full-time small cabin kitchen needs a minimum 6-foot counter run, a full-size refrigerator (not a compact one), and a dishwasher if you can plumb for it. The dishwasher pays for itself in daily convenience within a year.
Here’s a practical insight most people overlook: plan your cabin’s HVAC around zone heating, not central air. An 864-square-foot space heats and cools quickly with a mini-split system, but doing it zoned means you only condition the rooms you’re using. A single ductless mini-split in the living area plus one in the master bedroom typically costs $4,000 to $7,000 installed and handles an 864-square-foot cabin efficiently.
How Does a 24×36 Compare to Other Cabin Floor Plans?
Before you commit to the 24×36 cabin plans, it helps to see how they stack up against nearby sizes. A 20×30 cabin gives you 600 square feet. A 28×32 gives you 896. A 30×40 opens up to 1,200 square feet. Each size has a different use case.
| Size |
Square Footage |
Beds |
Baths |
Best For |
Est. Build Cost |
| 20×30 |
600 sq ft |
1 |
1 |
Weekend cabin |
$60K–$95K |
| 24×36 |
864 sq ft |
2 |
1–2 |
Full-time or vacation |
$85K–$198K |
| 28×32 |
896 sq ft |
2 |
1–2 |
Full-time living |
$90K–$210K |
| 30×40 |
1,200 sq ft |
3 |
2 |
Family retreat |
$120K–$280K |
The 24×36 hits a unique balance. It’s large enough for genuine full-time living but small enough to keep construction costs and property impact manageable. The 28×32 is only 32 square feet bigger—barely worth the extra cost unless you specifically need that floor space for a particular layout.
What Should You Consider for a Mountain Retreat Plan with 24×36 Cabins?
If your 24×36 cabin plans are headed for a slope or a wooded lot, a few things change. Foundation choices shift from standard slab to pier and beam or a stepped foundation that follows the contour. This can add $3,000 to $8,000 to your foundation cost but prevents expensive cut-and-fill work.
Roof pitch matters more on a mountain site. A 6/12 or 8/12 pitch sheds snow better than a standard 4/12 and reduces the risk of ice damming in winter. That steeper pitch also gives you more headroom in the loft area if you’re going that route.
Decks and outdoor living space are where a mountain retreat plan really comes alive. A 12×16 deck off the living area adds roughly 192 square feet of usable outdoor space and typically costs $8,000 to $15,000 depending on materials. Composite decking runs $15 to $30 per square foot installed, while pressure-treated pine runs $8 to $15.
Wind and seismic considerations vary by location. If you’re building in a high-wind zone, your framing and roof tie-downs need to meet stricter codes. Check your local requirements through your state or county building authority to understand what applies to your site.
What Is the Build Timeline for a 24×36 Cabin?
A 24×36 cabin typically takes 4 to 8 months from permit to final walkthrough if you’re managing the build yourself or working with a small local contractor. Here’s a realistic breakdown:
- Permitting and site prep: 2 to 8 weeks depending on your jurisdiction
- Foundation work: 1 to 3 weeks
- Framing and shell: 3 to 5 weeks
- Rough plumbing, electrical, and HVAC: 2 to 3 weeks
- Insulation and drywall: 2 to 3 weeks
- Interior finishes and trim: 3 to 5 weeks
- Exterior finishes and deck: 2 to 4 weeks
- Final inspections and punch list: 1 to 2 weeks
Delays most commonly come from permit review times, material lead times for windows and specialty items, and weather interruptions during foundation and framing. Order your windows and doors early—custom or energy-efficient units can have 8 to 12-week lead times.
What Key Design Decisions Should You Make Before Building?
Before you finalize your 24×36 cabin plans, lock in these five decisions. They shape everything that follows.
First, decide whether you want one or two bathrooms. A single full bath works for a vacation home layout. Two baths make a full-time small cabin significantly more livable, especially if you have guests staying over regularly.
Second, choose your roof style. A simple gable roof is the most cost-effective and easiest to build. A hip roof looks more refined and performs better in high winds but costs 10 to 15 percent more in materials and labor.
Third, pick your exterior material. Board-and-batten siding is classic for a mountain retreat plan and costs $8 to $14 per square foot installed. Cedar shake is beautiful but requires more maintenance. Metal siding is the lowest maintenance option at $7 to $12 per square foot and lasts 40-plus years.
Fourth, determine your heating and cooling strategy. A mini-split heat pump system is the most efficient choice for an 864-square-foot cabin. It provides both heating and cooling and typically costs $4,000 to $7,000 for a two-zone setup.
Fifth, plan your utility connections. Will you be on city water and sewer, a private well and septic, or completely off-grid? Each option has a very different cost profile. A well drill can run $15 to $30 per foot. A conventional septic system costs $5,000 to $12,000. A composting toilet system runs $500 to $2,000 and can be a smart choice for a full-time small cabin where water conservation matters.
What Common Mistakes Should You Avoid with 24×36 Cabin Plans?
Even experienced builders make avoidable errors when designing a cabin of this size. Here are the most costly ones.
1. Undersizing the kitchen. An 8×10 kitchen in an 864-square-foot cabin leaves almost no room for a dining area. Aim for at least 10×12 if you want a functional kitchen with seating.
2. Forgetting about laundry. There’s rarely a good spot for a washer and dryer in a 24×36 cabin unless you plan for it. Build a small laundry closet near the bathroom or kitchen early in the design phase. A stacked unit needs roughly 2×3 feet of floor space and 2×6 feet of clearance for the door.
3. Skipping the mudroom or entry storage. Every door that opens to the outside is a potential dirt and snow entry point. A small entry area with coat hooks and a bench adds about 30 square feet but dramatically improves daily livability in a full-time small cabin.
4. Not planning for future expansion. If you think you might add a second bathroom or a loft later, frame with that in mind now. Reinforcing a wall or planning plumbing chases during framing costs almost nothing. Retrofitting them after drywall goes up is expensive and messy.
How to Find and Verify Your 24×36 Cabin Plans?
Not all cabin plans are created equal. Some are sketches that look great on paper but don’t account for structural loads, insulation requirements, or local code. Here’s how to separate the useful plans from the decorative ones.
Look for plans that include structural engineering details: beam sizes, joist spans, rafter specifications, and foundation details. A plan set without these is just a floor layout, not a buildable document. You’ll need engineered details anyway for permit approval in most jurisdictions.
Check that your plans address energy code compliance. The International Residential Code (IRC) sets baseline requirements for insulation R-values, window U-factors, and air sealing. Your local building department will reference these codes, so your plans should too. The U.S. Department of Energy provides useful guidance on insulation standards for different climate zones.
Consider working with a local architect or draftsperson to review any plan set you purchase. A one-time consultation fee of $500 to $1,500 can catch errors that would cost thousands to fix during construction. This is especially valuable if you’re adapting a generic larger cabin floor plan to your specific site conditions.
What Should Be in Your Final Checklist Before You Start Building?
Before you order materials or pour a single foot of foundation, run through this list. Each item represents a decision that will be expensive or impossible to change once construction begins.
- Verified your zoning allows a structure of this size and use on your lot
- Confirmed your build site has acceptable soil conditions for your chosen foundation type
- Obtained all required permits and inspections scheduled
- Finalized your floor plan with room dimensions that match your actual furniture and appliance needs
- Selected your roofing, siding, and window package and confirmed lead times
- Budgeted for utility connections and set aside a 15 percent contingency fund
- Reviewed your plans with a local builder or structural engineer for code compliance
24×36 cabin plans offer a rare combination: enough space for real living without pushing into expensive territory. The 864-square-foot footprint gives you room to breathe, room to host, and room to grow into if you’re planning a full-time small cabin. The key is getting the layout right before you break ground.
Take your time with the floor plan. Walk through each room in your mind. Measure your largest furniture pieces. Think about how you’ll move from bed to kitchen to bathroom on a normal morning. The best 24×36 cabin plans aren’t just about square footage—they’re about how that space serves your actual daily life.
Frequently Asked Questions
Can you live full-time in a 24×36 cabin?
Yes. At 864 square feet, a 24×36 cabin is comfortably livable for one or two people full-time. The key is smart layout design with adequate storage, a properly sized kitchen, and efficient heating and cooling. Many people use this size as a primary residence, especially in rural and mountainous areas.
How much does it cost to build a 24×36 cabin?
Building a 24×36 cabin typically costs between $85,000 and $200,000 depending on finish level, location, and whether you do the work yourself. A basic DIY build with modest finishes can approach the lower end, while a turnkey build with high-end materials pushes toward the upper end.
What is the average square footage of a 24×36 cabin?
A 24×36 cabin provides exactly 864 square feet of floor space. With a loft added, total usable square footage can reach 1,050 to 1,100 square feet. This makes it one of the most efficient larger cabin floor plans for the cost per square foot.
Do 24×36 cabin plans require a permit?
In most jurisdictions, yes. Any permanent structure over a certain size threshold requires a building permit. An 864-square-foot cabin almost certainly meets that threshold. Check with your local building department for specific requirements in your area.
What is the best layout for a 24×36 vacation home?
The most popular vacation home layout for a 24×36 cabin features an open great room and kitchen on the main floor with a loft bedroom above. This maximizes the sense of space during the day while providing private sleeping quarters at night. A second bedroom on the main floor is also a strong option if you expect regular overnight guests.
How long does it take to build a 24×36 cabin?
A 24×36 cabin typically takes 4 to 8 months from permit to move-in, depending on your experience level, contractor availability, and material lead times. A DIY builder with a helper can often complete the project in the 5 to 7 month range with consistent weekend work.